3 ways to create mail on your own domain
Hello everyone! In the request, how to create mail with your domain is already a hint how to implement it. Usually arranged on hosting. It is on hosting that you have the opportunity to create an email with your domain literally in a couple of minutes.
Why do you need mail with your domain?
Usually the need for such mail occurs in the following cases:
- So you can stand out against the background of competitors. "Loose to the holes" yandex.ru, Mail.Ru, Gmail.ru no longer attract attention, and email addresses with such endings are simply not remembered;
- If the domain of your site is known on the Internet, and it has many readers and subscribers, the mail with this domain will additionally attract attention and speed up the implementation of your goals;
- Using mail with the domain name when communicating with clients, more confidence is automatically formed to you and your services.
How to create email on your domain on TimeWeb hosting
As far as I know, all hostings on which sites are located, make it possible to create such mail. If I am not right, please write in the comments.
My domain is located on the TimeWeb hosting. It is on his example that I will show the whole process. In fact, it's easy.
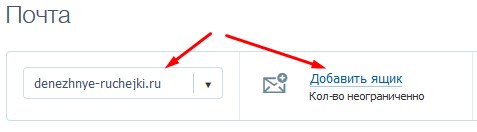
Go to the TimeWeb hosting administrator and on the left in the Find menu post office.
In a new window, you will see the panel where your domain name will appear and a link. Add Box. To create mail with your domain, you need to click on it.
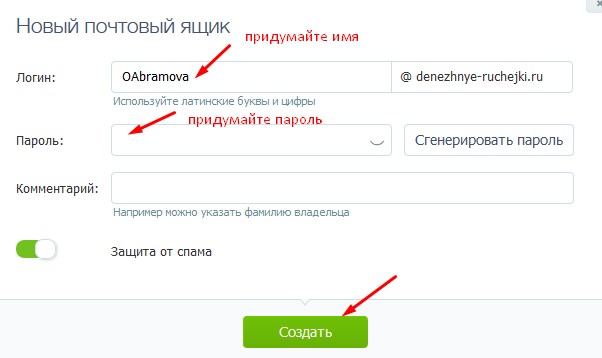
At the final step, fill in the empty fields: Come up with the name for your mail and password. By the way, the password can be generated.
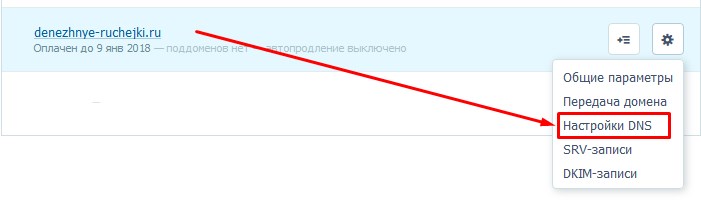
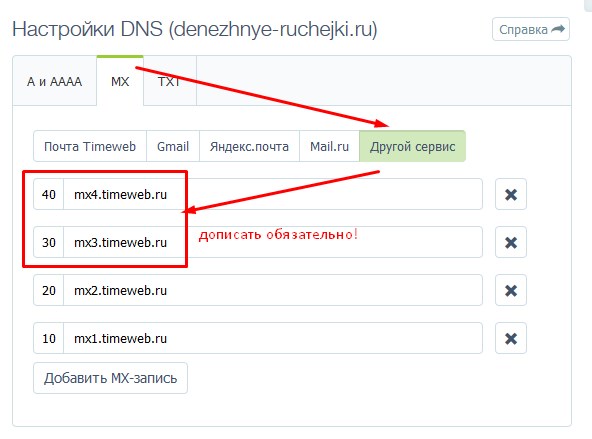
Attention! The mailbox on Timeweb is protected by Kaspersky Anti-Virrup, so for what you could receive letters to your mail, you need to add two entries in the DNS settings - MX tab is another service. This can be done through the domains menu and subdomains.
Settings of the e-mailbox
Pay attention to the first point: on hosting with your domain there is an opportunity to register an unlimited number of boxes.
And the second point: each box has the settings that you can edit.
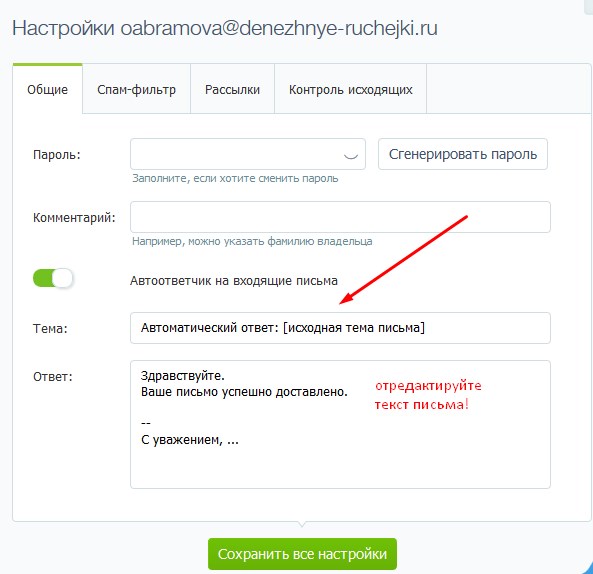
- In general settings, you can change the password and include an answering machine to incoming letters. Simply put, if you connect this feature, the senders of letters to your mail will be able to receive notifications about their delivery automatically. And here you can beat this feature and include information that you would like to convey to the addressee.
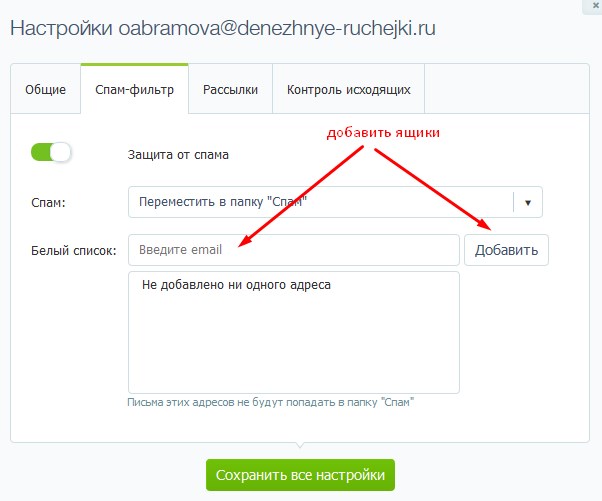
- "Spam filter" will allow adding electronic addresses of those boxes, letters from which should not fall into spam.
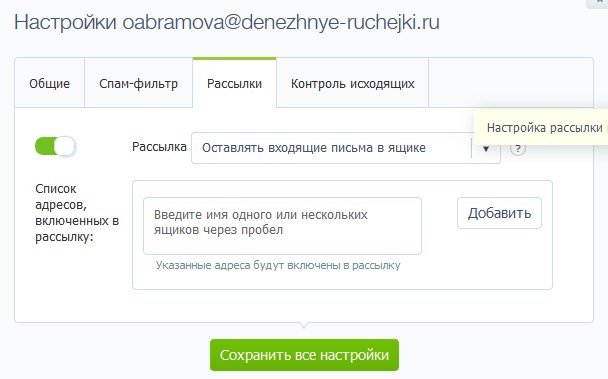
- In the "Mailingup" tab, you can add a list of addresses included in the newsletter.
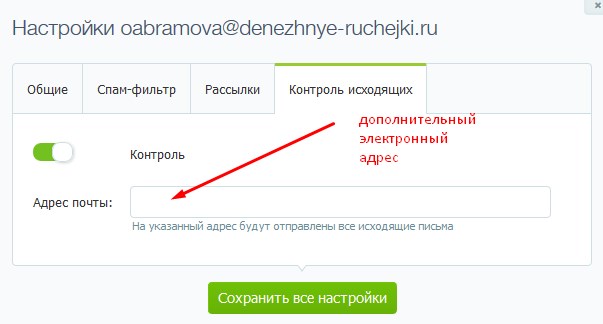
- "Inbox control" will allow you to receive all letters sent from your mail on the domain to the additional address specified in the settings.
How to open mail created
To get inside the mailbox, go to hosting, select in the menu post office, Click on the desired address and enter the password you specified during registration. And you will find yourself inside your e-mailbox.
P.S. In fact, there is another reason why I devoted this article to how to create mail with my domain. In the next article, I will tell you how to add a subscription form to your site through the service. And for this we will need such email.
Starting creating this article, I wanted to pay attention to the creation of mail only through hosting. But in fact, I know two more options, as can be done: Using the possibilities of search engines Yandex.ru and Mail.ru.
How to create mail with your domain for free on yandex.ru
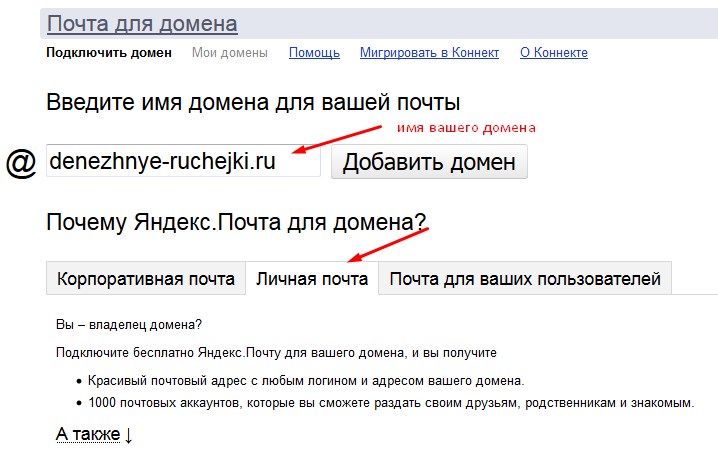
Copy and paste the following link https://pddd.yandex.ru/domains_add/ in the browser. You must have a simple mail to Yandex.ru, and you must be logged in account.
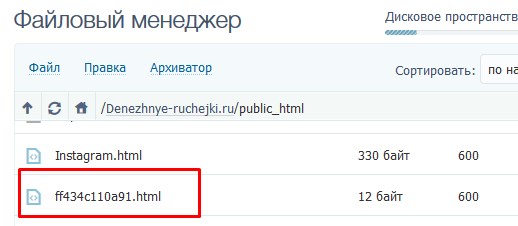
In the window that opens, the first thing you need to do is insert your domain name in an empty field. For example, look in the screenshot:
The next step is to confirm the ownership of the domain. This can be done with one of the three proposed ways. But I will choose, in my opinion, the simplest thing is to download the proposed file in the root directory.
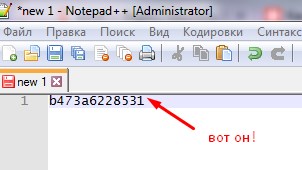
To create a file with extension.html, use the NotePad ++ program. It is free, and you can easily download it from the Internet. I already wrote about this program in one of my articles, and how you can work.
So, open NotePad ++ and insert the text in it, which we generated Yandex when adding a domain.
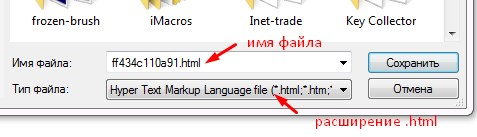
Now the saved file must be downloaded to your domain root directory. In my case, it will be the Public_HTML folder.
We have left to check domain ownership.
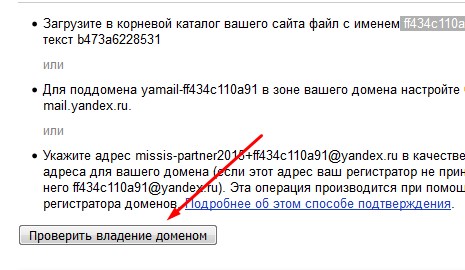
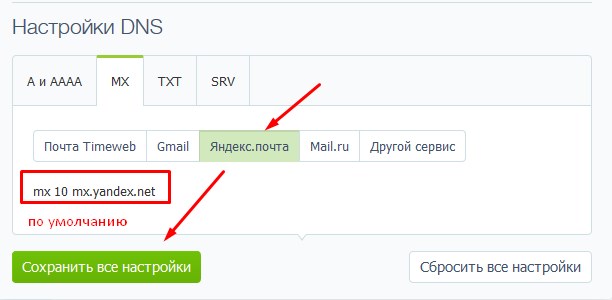
If you do everything right, you will reinforce you on the second step - setting up the MX record. It turned out to be very simple on my hosting on my hosting. In the tab Domains and subdomains In the site settings, I opened the MX section and chose Yandex Mail. Button Save all settings.
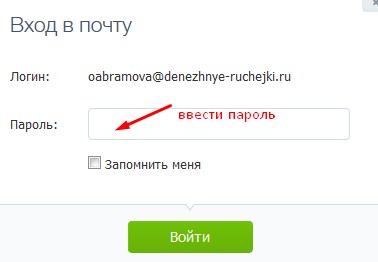
After confirmation on Yandex, a new window opened with the ability to enter a login and password for new mail on your domain.
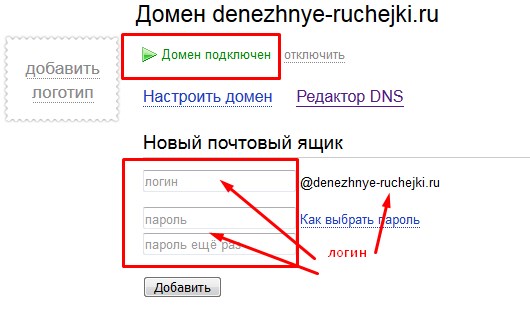
After all the successful of the above actions, we have only to enter the post office. Although here, to complete registration, I had to fill in a standard form.
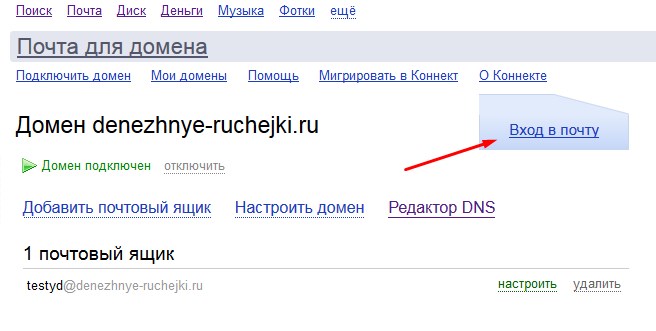
How to create email with your domain on Mail.Ru
Let's move to the last way and consider how to create mail with your domain through the Mail.ru search system.
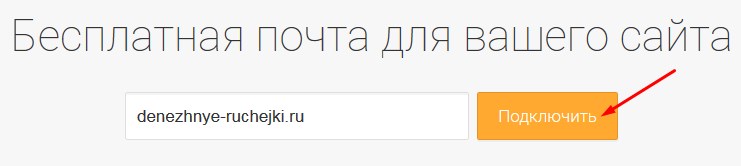
Copy and insert the next link https://biz.mail.ru/mail/ in the browser. Previously, you must have an electronic box on Mail.Ru, and you must be logged in in the system.
In the window that opens, insert the name of your domain to which you want to start a new mail.
The next step Mail.Ru offers to confirm that you are the owner of the specified domain. This can be done with one of the 4 proposed ways. We use the same way as on yandex.ru. Fortunately, here we do not need to form an HTML file yourself - it only needs to download and download it in the root directory of your site.
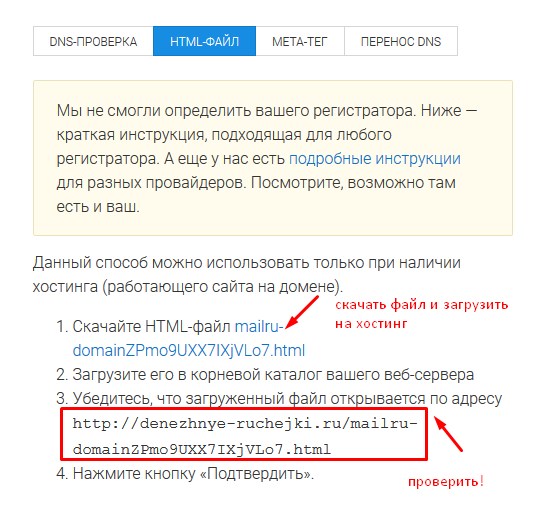
I think you already understood how it can be done. And if not - see my video tutorial. Follow the instructions.
The last step is to configure the MX record. Exactly by analogy with Yandex.ru.
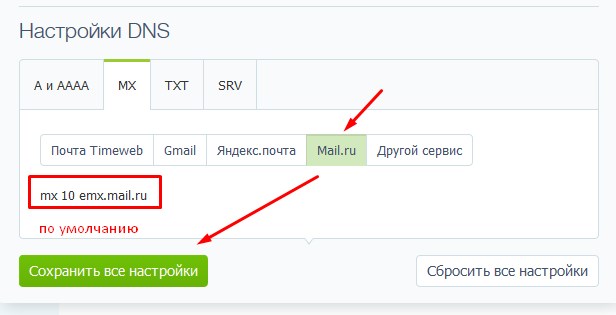
It would seem that all, but Mail.Ru threw another task. In addition to setting up the MX recording to create mail on your domain, you must still configure the SPF record and DKIM signature.
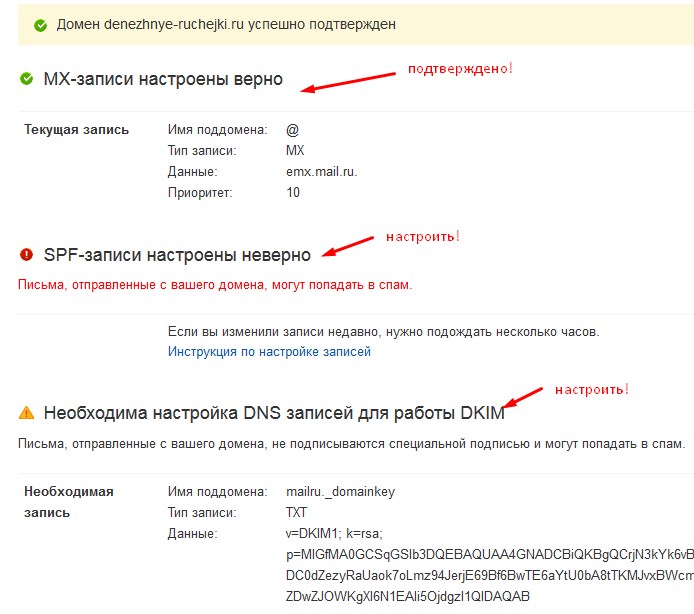
SPF recording setting
To configure the SPF record, you need to go to the settings of your domain, with the name of which you actually want to create mail, and add the next entry V \u003d SPF1 REDIRECT \u003d _SPF.Mail.ru to the TXT tab.
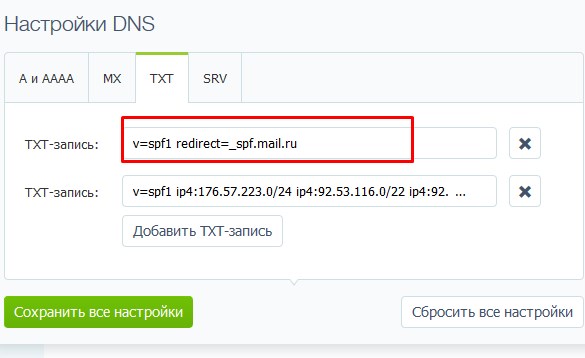
The configured SPF record will protect the domain from the fake and will not allow your letters to get into spam.
Setting up DKIM signatures
DKIM-signature increases letters delivered and allows you to confirm that this is the real address of the sender.
To configure the DKIM signature with Timeweb hosting, a small problem arose. To implement this precisely on this hosting, it was necessary to create the domain to create the MailRu._Domainkey subdomain, that I could not have done because of the point that is in the name.
I applied to the support service, and they did it on their own. At the new subdomain, you need to add a new entry into the TXT tab.
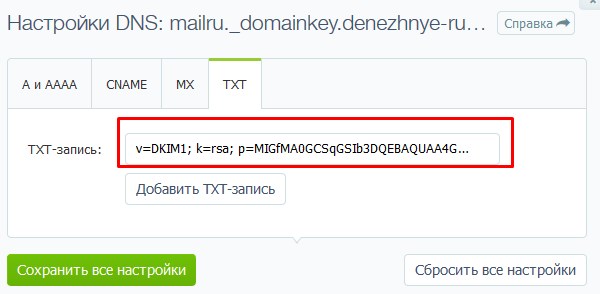
To make changes to the Mail.ru tip, you must wait a few hours. We wait).
In principle, so far the changes are written on the network, you can already register mail with the name of your own domain via Mail.Ru, if you managed to configure the MX record.
To do this, in its main mail on Mail.Ru click on the tab All projects - Mail for business.
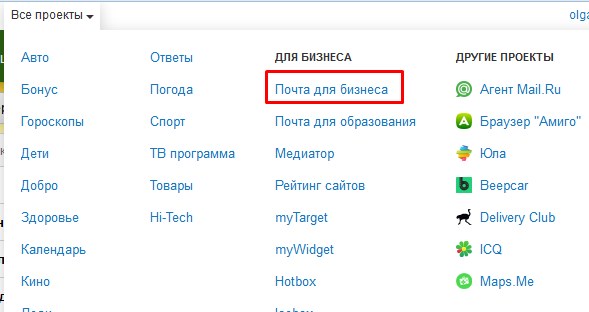
In the next window - on the Mail.Ru button for business.

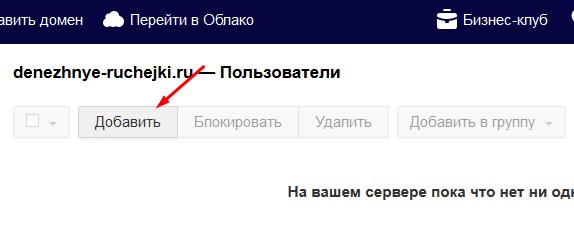
Now add the user.
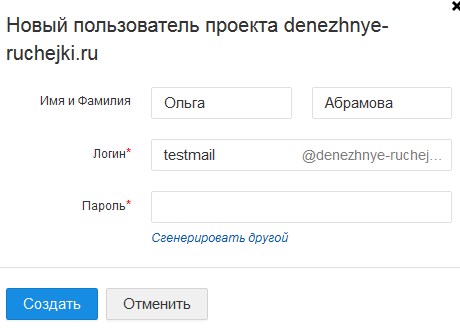
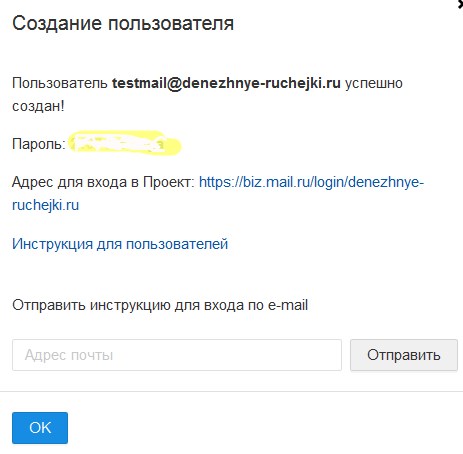
In the next window, enter the name and surname, come up with a name for your new mail and password.
We looked at three ways to create mail on your domain. In my opinion, do it through your own hosting is the easiest way. And what do you think please write in the comments.