Knitted top T-shirt crochet pattern. Crochet T-shirts: step by step instructions and patterns
Now I’ll tell you in detail how I knitted it, and how not to do it.
Let's start with yarn. I bought 2 skeins of Semenov yarn Sail(cotton - 25%, viscose - 75%, 360 m / 100 g). By the way, I didn’t have enough of them: I wanted to tie the bottom and armholes, but I tied only the neck - and then simply. And since Sveta said that she liked it anyway, I won’t buy a third skein anymore.

Crocheted No. 2.5.
Crocheted summer T-shirt
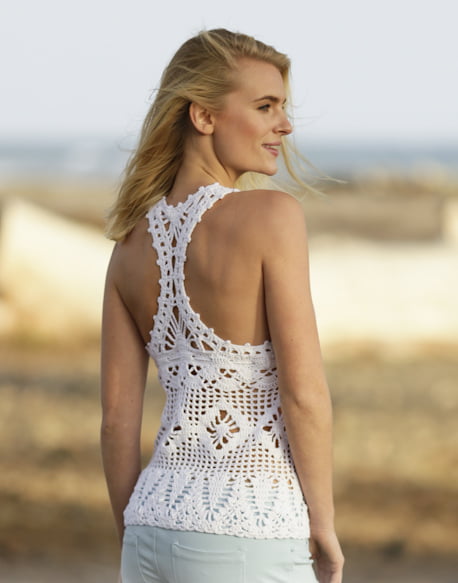
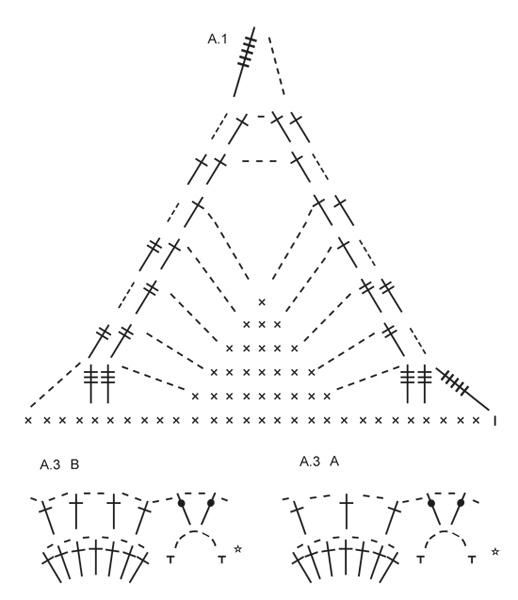
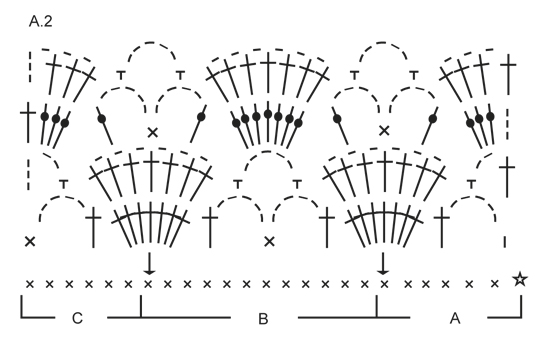
I chose this crochet pattern (see diagram 1). It is interesting that it is knitted from fans (or shells), but in fact, flowers with five petals are obtained (see the photo below the diagram).

In general, I thought that everything would be very simple and did not bother myself with knitting a pattern sample and calculating the required number of loops. But in vain))).
I started by knitting a chain of air loops, the number of which is a multiple of the number of loops in the pattern repeat, in this case 10. That is, I scored 120 VP, and attached this rope to my daughter in the place where the T-shirt should end (from one side to another). And she began to knit according to the above pattern, without being distracted by anything.
When I knitted it to the beginning of the neckline, I looked at the resulting detail and was very surprised - it was so narrow that it didn’t pull on half of the T-shirt even for my youngest daughter))). Even considering that the T-shirt will stretch, it is still small!
The thought of "dissolving and bandaging" drove away immediately))). I thought about knitting the second half with the same narrow one, and sewing some lace stripes between them. But she didn’t complicate it and made it easier: she made the 2nd half of the T-shirt wider (gained 140 VP) and with armholes (see pattern):
The result is a crochet T-shirt. The first (narrow) part will be at the back, so the side seams will also be located a little closer to the back. And in general, everything turned out very decently))). (But it’s better not to be lazy and do everything according to the rules, then it will do without unnecessary worries 🙂).
Separately, I want to say about the neckline. To knit the entire detail of the front (or back) without breaking the thread and extra knots, I did the following (see diagram 2).
First, she knitted the right shoulder strap, decreasing the loops, and after finishing it, she went down with arches (marked in green in diagram 2) to the bottom of the neck and knitted the left side of the T-shirt. If the arches seem too big for you, make them smaller. And in general, you should not strictly follow the descriptions. Create!
It turned out like this:

Having connected 2 parts and completed the shoulder and side seams, it remains only to crochet a summer T-shirt. As I said, I only have yarn left for tying the neck. Enough for 2 rows:
1 row - single crochets (make so many of them in each arch so that nothing sticks out and does not pull together),
2 row - alternate 2 connecting columns and 3 VP.
How to crochet a summer T-shirt? We will tell you about this with the help of our master class and a diagram with a detailed description of each knitting step.
Tools and materials Time: 120 hours Difficulty: 10/10
- hook 3.5 mm;
- cotton yarn - 350-350-400-450-450-500 gr.;
- scissors.

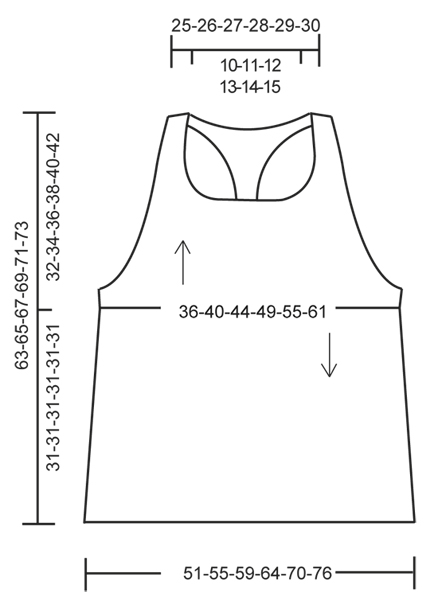
Size: S - M - L - XL - XXL - XXXL
Exact dimensions:
Bust: 72-80-88-98-110-122 cm.
Full length: 63-65-67-69-71-73 cm.
Abbreviations
- pp - lifting loop;
- vp - air loop;
- s2n - double crochet;
- ssn - single crochet;
- cn - connecting loop;
- sc - single crochet.
Step-by-step description of the master class
The jersey is knitted in opposite directions from the middle. Also, front top and back top are knitted separately. The entire lower part is made with a single canvas in a circle.
Step 1: Knit the top front of the shirt
Knitting occurs at 175-194-213-237-266-295 ch. The first six rows are ssn, in a circle. These rows wrap around both the front and back of the jersey. In the third row, evenly skip 1 dc and replace it with 1 ch. This will create the necessary holes for the lace at the waist.
Now knitting occurs only on 72-80-88-98-110-122 columns of the front.
- We begin to carry out the side bevels of the armhole. To do this, on each side of the canvas we do not knit 1 extreme st. So we perform 16-18-19-21-22-24 times. It remains 40-44-50-56-66-74 st.
- We start knitting the front parts of the straps of the T-shirt. They consist of 10-11-13-15-19-22 sts from the edge of the bevel of the armhole. We reduce the columns by 1 on each side until 4 tbsp remain. in all sizes.
- We continue knitting for 40-44-48-52-56-60 cm. Cut the thread and fasten. We knit the second strap in the same way.

Step 2: Knit the top back of the shirt
The back part consists of two triangles, i.e. in the upper part of the back and in the lower part. All knitting takes place in accordance with the attached scheme, but in the last row it is necessary to connect the knitting of triangles with the already created straps and part of the belt.
Step 3: Knit the bottom of the shirt
First, we perform a pattern with fans, then with rhombuses, where the gradual expansion of the canvas takes place, by adding columns to knitting. And we finish knitting this part with a herringbone pattern. Thus, the lower part is wider than the belt part, 15 cm in each size.
Step 4: Tie the top of the shirt
To do this, we perform all the edges:
- Row 1: The whole row of sc.
- Row 2: Then follows the row with dc.
- Row 3: 2 dc, 2 ch and so alternate until the end of the row.
- Row 4: SSN and "pico" from ch 3.
Step 5: Finishing knitting and further care of the product
After completing knitting, it is necessary to firmly fix the ends of the threads.
Wash the product by hand in soapy, NOT HOT !, water and lay it out on a terry towel without squeezing.
This should be done every time you wash a crochet item made of cotton yarn. Then the T-shirt dries in this position, you should only turn it over occasionally and stretch it a little in different directions. After complete drying, the product should not be ironed! With proper care, such a thing will last more than one year and will not lose its shape or overall attractive appearance.
This fall, crochet knitted tops, blouses, t-shirts and jackets have returned to the trend. You can find them in any fashion boutiques with clothes, but it is best to knit such a thing yourself. To do this, there are many detailed master classes, video tutorials, step-by-step descriptions and detailed diagrams (C / X). They will be mastered by both experienced needlewomen and beginners to knit.
How to knit a women's top, how to choose the right size, find original patterns, choose a striped, fringed or cropped top - answers to all these and other questions in our knitting section.
Crochet the top - diagrams with a description
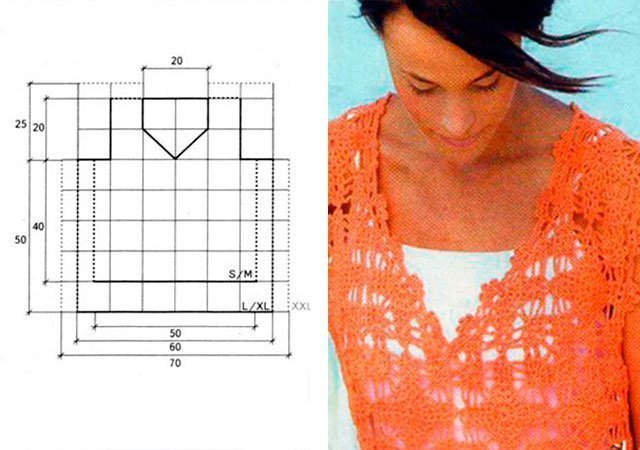
Turquoise summer crochet top with white trim . It will turn out very loose, with a pattern of " pineapples ". To knit it, you need to use hook No. 2 and threads of two colors, 100 grams of each skein. This beautiful top will be with short sleeves, a little long. It is better to choose threads not cotton, but microfiber- it is easier to work with it, and the product will turn out light and airy.

So, as usual, you need a pattern. Knitting - from top to bottom.

It may take a lot of time to work. But the result is worth it! The technique is simple, you can take different colors (white, blue, beige, green or red). It is especially good that the product is knitted in one piece and you do not need to assemble anything. Next, you can sew big beads or large rhinestones on the finished thing to make it more elegant. Also, it is perfect for pregnant women, only you will need to slightly change the size of the pattern.
Popular articles:
How to crochet for beginners step by step
How to crochet a top for beginners? Almost all beginners in this business ask this question. Do you want to knit a beautiful women's thing for summer or autumn? To do this, take a warm color - orange and hook number 3. With the help of these simple materials, we will tie you a long stylish wardrobe element of flowers. It is very easy to make if you follow the detailed description. Things with such a branch theme will not leave anyone indifferent!
- first motive tie like this: 7 V.P. - a chain in a ring. Follow 2-6 R. in S / X one. Cut the thread after knitting.
- motive number 2 : according to the scheme one - 1 - 5 R. When you reach the sixth row - start connecting the motive with the previous one. In this simple way, connect all the motives by analogy.
- need 52 motives , performed on 1 C / X, and on the second - 2 halves. And tie the neckline in the same way according to C / X 1.

How to crochet a tank top for beginners video
How to crochet a summer top - a t-shirt for beginners
To tie top - shirt , you need to pick up good schemes with a description for beginners. For such a sweater with a pattern you will need: Hook number 2 and white thread, preferably from cotton, 250 meters.

So our future T-shirt with straps with bare shoulders knitted in one continuous piece. Starting with top future jersey: VP 200 in the ring, 3 V.P. for lifting. Further circular R. from S.S.N. Thus, start each new R. - with 3 V.P., and finish it with the help of S.S. When you make 8 centimeters S.S.N. - knit according to C / X 10 - 1 (exactly forty rapports). Now the lower part according to the scheme 10 - 2. The canvas in width should accommodate 10 rapports of the pattern. The following order will help not to go astray: repeat 1 time 14 -19 R., then 1 time 26 - 31 R.

When you have completed all the steps above, proceed to the straps: 12 V.P. - direct and reverse R. - S.S.N. to the length you need. Knit the second strap in the same way. After - sew them to the product. In order for a crocheted T-shirt to look harmonious, it must be tied according to C / X 10 - 3.
Crocheted: women's summer sweaters, tops, t-shirts
Let's start with coral. This is a universal model - it can be worn by a girl - a teenager, a woman or a little girl. In the latter case, it can be worn as a tunic. Materials: hook number 2, 150 grams of the main color, 25 grams each (5 more colors): raspberry, pink, cream, coffee, purple.

Main color: chain 120 V.P. in the ring - knit a yoke according to C / X 1. After 9 R. change the color to cream (3 R.), coral again to get 18 R. For the armhole, dial 10 VP, for the sleeves leave loops on both sides. Further in a circle (diagram 2). After 20 R. are ready, start alternating shades, based on the scheme. Tie the edges of the product with S.S.N. The flower is performed according to C / X three.

Beautiful top "tenderness".
On it, take 50 grams of green thread, red, pink and light green. The tool is still the same - No. 2. Flowers and leaves
: C / X 1 and 2. To make the work beautiful, the pattern must be made in full size. Place the finished motifs face down on the pattern and sew together. 

Summer crochet top from motifs: photo
Great top for a teenager - a beach option for the summer
. You will find the schemes below in the picture, and the description is right now:
Knit all elements according to the scheme
. The product will need 27 triangles For front parts and the same for rear. Total: 54 triangles.
You can knit them in different colors, you can one or two. Then they need to be sewn to each other. But it is better to leave the thread at the end (1 m) after stitching all the elements together, and tie all the parts with it. neck, sleeves And bottom tie s.b.n. + 1 V.P. 

Crochet crop top
Crocheted short top - the trend of the outgoing summer and the coming autumn.
The following MK will tell you in detail how to knit it correctly: scheme and description.
This crop top looks great with knitted shorts. We will knit it in two parts: front and back. For front dial 120 V.P. into a chain. Knit on C / X the second 30 centimeters. To do neck- both shoulders will have to be knitted in turn, leaving 22 cm for the cutout in the center of the fabric. Shoulder size - 10 x 10 cm.
Backrest: 120 V.P. - according to C / X 2 to the size of a rectangle with sides 42 and 48 cm.
We collect, performing side seams, not forgetting about armholes.


Crochet openwork top for beginners
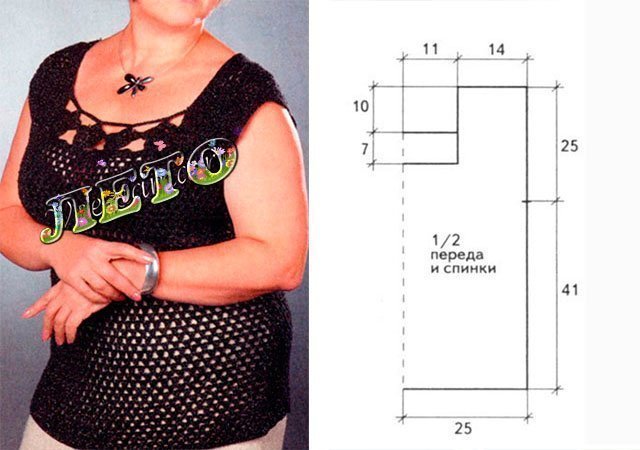
This top is designed for full ladies
. It is made in classic black color, which will noticeably hide all the extra centimeters. The pattern will be required in full size, because we will knit strictly according to the scheme, but by decreasing / adding loops according to the pattern. This should be done in order for the pullover to fit perfectly.
Tie the armholes and the bottom edge, as well as the neck of the S.B.N. You can make flowers for decoration according to the scheme of three, this is optional.

The next option is more small size. He'll get more easy And air. Because you need to take thin threads and No. 1 hook.
- Recruiting 8 V.P. in the ring, close the semi st
- 3 V.P. underground - and on S / X further. When you complete the first 2 R. - you get a pattern resembling a flower.
- 3 R.: 4 V.P., S.B.N. - behind the flower.
- Make 44 motifs and sew them together.
- Tie the finished element " step by step».


How to crochet a top for a girl?
Children's top for a girl aged 4 - 5. You will need: multi-colored yarn (we have pink, white and purple colors) and hook number 3.
Each row is a different color.

This is what we got before. To tie back part - follow all the same steps, but with a smaller cutout. After that, the seams can be sewn, and tied around the perimeter with a “crustacean step” (С.С.6 N.).

New autumn 2018: photo selection


Master class: crochet openwork top - video
Knitting by a hook — Svetlana Fabricy
You can knit a T-shirt-top for a party, it is also relevant for going to the beach. Lightweight breathable blouse will be more useful than ever in everyday life, especially in the summer heat. Today we will talk about beautiful crochet t-shirts with a description, diagrams and detailed tutorials for beginner craftswomen.
White summer tank top for beginners
We will need:
- yarn (70% cotton, 30% viscose, 350 meters per 100 grams), 2 skeins;
- cr. No. 3;
- about 1.5 meters of a white narrow satin ribbon.
patterns
- Cups: stick to cx. 1, where cr. R. from 1 to 6, etc. and arr. from 7 to 16.
- Back: x. 2, where pr. and arr. rr..
- Openwork: CX. 3, where cr. R..
Finished size: 36.
Scheme
Model description
We carry out the work in stages.
bodice
Knitting is carried out in the direction from the bottom up.
The rise to a new row is determined in the middle of the front side, between the cups.
Having knitted 6 cm from the typesetting row, close 53 p. of the back and continue knitting each cup separately with straight and reverse rr. 1 from 7 to 16 rr.
Without cutting the thread, we start knitting straps (about 20 cm in length), repeating in height 17-18 rr. Sew the free end to the back.
We knit the second cup in exactly the same way, make another strap and sew it on.
Bottom part
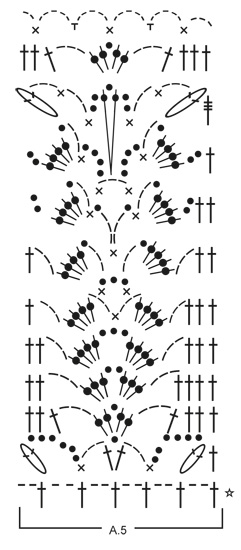
Here we will use circular knitting from top to bottom, knitting an openwork pattern according to cx. 3 (about 10 repetitions). At this stage, we place the line of transition to a new row on the side.
Assembly
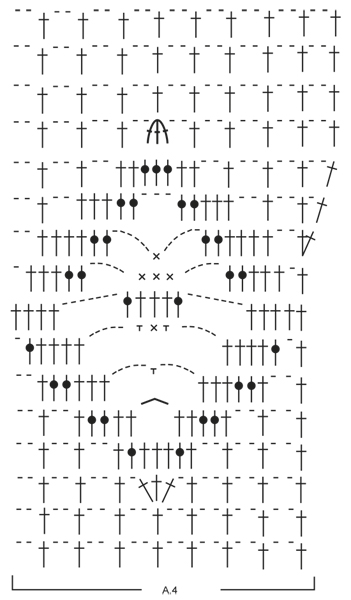
We finish the top of the bodice and along the edges of the straps (see figure 4). At the transition point from the top to the bottom, we thread a satin ribbon, which will regulate the volume under the chest and serve as a decor.
T-shirt with open back: video master class
Sunny T-shirt with an openwork stripe
We will need:
- yarn (60% cotton, 40% polyacrylic, 130 meters per 50 grams), 5 (7) hanks;
- cr. No. 3.5.
Finished product dimensions: 36/38 (42/44).
Main pattern: number of p. cr. 3 + 2 + 3 in. p.p. Knitting is carried out according to the scheme. with p. before rapp., rep. rapp., order. n. after rapp .. Replace the first s. from n. each r. for 3 in. p.. Repeat x 1 from 1 to 3 p., then alternate 2-3 p..
Knitted flowers x 10 (x 12): 6 c. p., ss. We continue knitting kr. R. according to cx. 2, each new cr. R. we start from v. p.p. instead of the 1st p. and finish ss. in the last c. p.p. Repeat from 1 to 3 cr. R. x 1. The second motive and then join. in the last cr. R. in the places indicated by the arrow with the help of ss. to the previous motive, to get a circle, we connect the last motive also with the first.
Density knitting osn. knots: 24 p. x 9.5 p. = 10 x 10 cm, flower 8.5 x 8.5 cm.
Scheme and pattern
Model description
Back
We knit a chain of 101 (122) in. n. + 3 c. p.p., osn. pattern within 8 (9) cm.
For the top, we again make a chain of 101 (122) in. n. + 3 c. p.p., osn. pattern until a length of 16 cm is reached, where we leave 9 p. for washouts on both sides and 2 p. in each. x 3 p. = 71 (92) p..
Having knitted 26 (27) cm from the embankment. row, leave the central 39 (46) p. (neck section), finish each side separately.
For rounding, we leave from the inner edge in each p. 2 x 3 and 1 x 2 p. We finish the work after 35 (36) cm on the remaining 8 (15) p. of the shoulder on both sides.
Front end
It is knitted in the same way as the back, but with a deeper neckline: after 21 (22) cm from the emb. leave the central 27 (34) p. and in each p. 4 x 3 and 1 x 2 p..
Assembly
We carry out seams of the lower and upper parts. We connect a strip of flowers with the top and bottom with chains from c. p.. We tie all the edges of 1 cr. R. “Shells” (= * 1 s. without n., skip 1 p. pr. p., in the next p. 5 s. with n., skip 1 p. pr. p. *, from * to *).
Top T-shirt Fillet crochet diagonally: video mk for beginners
Air top for beginners
We will need:
- yarn (50% cotton, 50% acrylic), 150 grams;
- cr. No. 3.
Finished product size: 46-48.
Knitting density: 22 p. x 17 p. = 10 x 10 cm.
Scheme and pattern of the model
Model description
Back
At the height 42 cm from beg. for openings, we decrease the item on both sides, as shown in the diagram..
At the height 59 cm from beg. leave 59 p. in the center and then knit both sides separately (1 rapport + 1 p. symmetry). Finishing work in 2 p.
Front end
Knit in the same way as the back. To make a deeper cut, at vys. 37 cm we leave the central 27 p., We knit the sides separately.
To cut the neck, leave on the inside in each p. alternating 3 p. and 2 p. until we get 1 rapport + 1 p. symmetry. We finish knitting at a height of 60 cm.
Assembly
We carry out side and shoulder seams, we do the processing of the edges of the armholes and the bottom of the product with a hook and 3 p. With. without n., and then - 1 p. "crawl step".
Knitting openwork T-shirts for beginners
We will need:
- yarn (57% viscose, 20% linen, 8% cotton, 15% popiacryl, 105 meters per 50 grams), 5 hanks;
- knitting needles number 4;
- cr. No. 3.5.
Finished size: 36-38.
Lace square: chain from 6 c. p., ss., further along cx. crochet 1. Knitting each cr. R. we start marked in. p. instead of the first p.
We finish 1 and 4 kr. R. 1 ss. in the last V. p.p., second cr. R. finish 1 s. from n. and 8 ss. 1st cr. r., third cr. R. finish 1 s. without n. in c. p.p. Repeat 1 x 1-4 cr. R..
Fringing from arches (number of p. kr. 9): according to cx. crochet 2 directly on 5 cr. R. bottom edge, this kr. R. is given under cx .. We start from the 1st century. n. instead of the 1st s. without n. and n. before the rapport, we repeat the rapport, having finished. 1 ss. in c. p.p..
Important! We knit arches in purl and facial rrs. The arrows indicate the direction of knitting.
Openwork pattern (23 p. + 2 edging): according to cx. for knitting needles (only facial pp. are indicated, in purl pp, we knit all stitches and crochets with purl ones). We start and finish. 1 edge loop, repeat 1-12 rr..
Knitting density: square - 9 x 9 cm; openwork - 25 p. x 28 p \u003d 12.5 x 10 cm; front surface - 18.5 p. x 28 p. = 10 x 10 cm; 20 s. from n. bottom = 10 cm.
Important! The direction of knitting changes in the process, follow the signs on the pattern!
Scheme and pattern of the model
Model description
Lower front side and back
We need to make 8 squares, then sew them into a strip, connecting the first and eighth, resulting in a circle, where 1-4 motifs are the front, 5-8 are the back.
For the upper finishing plank, we tie the right long edge of the strip 4 cr. r., each cr. R. starts from the 1st or 3rd century. n. instead of the first s. without n. or the first s. from n. and finished. 1 ss. in the last replacing c. P..
1 p.: 152 p. without n. (= 19 s. without n. per square).
2 p.: 1 s. s n., * over 1 s. without n. etc. cr. R. do 1 in. p., 1 p. from n. in sl. With. without n. *, from * to *, 1 c. p. and 1 ss. in the 3rd c. p.p..
3 p.: in each s. from n. and in. n. 1 s. with n..
4 p.: p. without n. The height of the top bar is 3 cm.
For the bottom plank, we tie the left long edge of the strip 6 cr. R.:
1 p.: 160 s. from n. (= 20 s. s. per square).
2 p.: p. without n..
3 p.: 2 c. n. instead of the first semi-st., * over 1 s. without n. etc. cr. R. do 1 in. n., 1 half-st. in sl. With. without n. *, from * to *, ending. 1 in. p. and 1 ss. in the 2nd c. p.p..
4 p.: in each semi-st. and every c. n. 1 s. with n, while in the 1st and 80th c. n. you need to connect 2 s. from n. = 162 s. with n..
5 p.: 3 c. n. instead of the 1st s. from n., * over 2 s. without n. previous cr. R. do 2 in. p., 1 p. from n. in the next With. without n. *, from *, over 2 s. without n. previous cr. R. 2 in. p., 1 ss. in the 3rd c. p.p..
6 p .: we knit 1 edge of the arches according to cx. crochet 2 (= 18 rapports, incl. beginning p.). The height of the bottom bar = 6.5 cm.
Center front and back
We crochet 25 sts and press between the hem sts with an openwork pattern. Through 72.5 cm = 204 p. from emb. the edge is all p. closed. We sew the first and last pp, the left long edge of the openwork strip to the final edge of the strip of squares is slightly seated.
Upper back
We crochet 66 sts, front surface. For bevels approx. from emb. edges from two sides in each 4 p. 6 x 1 p. = 78 p. After 10 cm = 28 p. from emb. to. closing for washouts of two sides 2 p. and in each 2 p. 4 x 2 and 7 x 1 p.
Having knitted 18.5 cm = 52 p. from emb. to. close for the neckline, last 44 sts..
Top front
66 p., facial surface. After 2 cm = 6 p. from set. to. we mark the 16th and 51st p. for the bust shape. In the next. persons. R. do on both sides of the marked. n. 1 yarn over and knit them in the out. R. purl (= 4 inc. p.); these increases rep. another x 3 in each. 2nd river After 5.5 cm = 16 p. from set. to. approx. for bevels from two sides 1 p. and in the next. 6th river 1 more x 1 p. = 86 p.
Important! Approx. and ub. for the bust on the pattern are not taken into account; on the contrary, it is based on the dimensions of the back.
We carry out the openings as on the back. Simultaneous with the 1st decrease in the proyochek, we perform one double for the bust shape. prot.: remove the marked item from the previous one. n. together as a front, trace. we knit the front stitch and stretch it through both removed stitches. These decreases are repeated. x 3 more times each. 4th p.. Simultaneously. with the first decrease in the openings, close. for the neckline, the central 2 p. and both sides finished. separately. For bevel cutout close. crochet in each. 2 p. 4 x 2 and 6 x 1 p. back we knit the remaining 3 sts with each. double sides. prot.; do not cut the working thread.
Assembly
We carry out side seams of the top of the back and front; sew the upper back and front along the pattern to the right long edge of the openwork strip. For straps, we include a loop and a working thread on the upper toes of the front, we knit a chain from 60 in. n. + 1 c. p., we tie the set. chain edge 60 s. without n. and finished. on the toe front 1 ss ..
For the final edge, we tie the common edges of the straps, armholes and neckline with 2 cr. R..
1 p.: p. without n., pay attention to an even number of stitches. In the corners of the back we knit for rounding by 4 s. without n. in the edge p..
2 p.: 3 c. n. instead of the 1st s. s n., * over 1 s. without n. prev. cr. R. need to do 1 in. p., 1 p. from n. in a trace. With. without n. *, repeat from * to *, order. 1 in. p. and 1 ss. in the last c. p.p.; sew on straps.
Openwork top: video instruction
White beach top
We will need:
- yarn (100% cotton, 125 meters per 50 grams), 5 (6) 6 hanks;
- cr. No. 3;
- 3 buttons.
Finished product sizes: 34-36 (38-40) 42-44.
It is important to prepare the pattern in advance and carry out approx. and ub. crochet, checking the workpiece with it.
Openwork at. (number of p. kr. 8 + 3 v. p, p.): circular pp. according to cx .. Beg. with p. before rapp., rep. p. rapp., order. n. after rapp., no. 1 x 1-7 rr., then alternate 2-7 rr.
Border: 1 s. s.n., pass. 2 p., 5 s. from n. in 1 p. bases, pass. 2 p. *, from * to *.
Knitting density: With. from n. - 18.5 p. x 12 p. = 10 x 10 cm; openwork y. - 22.5 p. x 12 p. = 10 x 10 cm.
Model Diagram
Model description
right cup
34th c. n. + 3 c. p.p., p. with n., while kazh. R. beginning from the 3rd c. p.p. instead of the 1st s. With. n. After 9 cm from the set. leave on the left side 17 p. After 18 cm from the set. we finish work.
Left cup
Symmetrical right.
Bottom
224 (240) 256 c. p., ss. in a ring, openwork. at .. In the 13th p. decrease for fitting 40 p.: prop. 40 x across. each 5 and 6 s. without n. (40 x each. 6 s. without n.) 35 x each. 6 and 5 x each. 8 s. without n. = 184 (200) 216 p.
These ub. repeat in the 25th p., pass. 40 x across. each 4 and 5 s. without n. (40 x each 5 s. without n.) 25 x transversely. every 5 and 6 and 16 x every 5 s. without n. = 144 (160) 176 p..
After 24 cm from the set. for the cut, we divide the work at the beginning of the cr. R. and knit pr. and arr. rr.. After 32 cm from the set. do 3 p. With. with n..
Assembly
Issue. crochet the central seams of the cups, we tie them on both sides with a border. Sew them to the bottom so that the lion. cup of the beginning at the cutout. For each strap we attach a thread to the corner of the cup, we make a chain from v. p. 30 cm long and tie it with a border. Sew on straps, tying. cut 1 p. With. without n., while doing 3 loops for buttons. We sew buttons.
Top T-shirt: video mk for beginners
Elegant summer white top
We will need:
- yarn (100% cotton, 150 meters per 50 grams), 4 skeins;
- cr. No. 3.
Finished product sizes: 34-36 (38-40).
Flower at. (number of p. kr. 19 + 18 (5) + 3 v. p. p.): according to ..
Knitting density: 24.5 p. x 10.5 p. = 10 x 10 cm.
Model Diagram
Model description
Back
94 (100) c. p. + 3 c. n..
After 17 cm from the set. to. we add two sides 1 s. from n. = 96 (102) p..
After 27 (28) cm from the embankment. we finish work.
Front side
The same, but with cutouts for the bust. We draw and cut out the pattern in full size and after 20 cm from the embankment. issue reductions under the bust, applying knitting to the pattern.
Bust (x 2)
6th c. p., ss .. According to cx. 2 direct and reverse pp. We replace the 1st s. from n. or half art. each r. for 3 or 2 in. p.p..
Repeat 1 x 1-4 rows, then alternate 3 and 4 rows, while continuing to increase in the middle. After 18 (19) p. from emb. we are finishing.
Assembly
Sitting down a little, we sew both honors of the bust, then vol. crochet side seams. We tie the bottom 1 cr. R. With. without n. and “shells” (1 v. p. p., * 2 v. p., prop. 4 p., issue in the next p. n., 1 s. with n., 1 semi-st. *, from * to *).
We tie the top 1 cr. R. "shells". To knit the straps, we attach the thread to the upper cape of the bust, we knit along the chain from c. n. 35 cm long, and tied. their 1 p. semi-st. Straps are tied around the neck or sewn to the back.
Selection of schemes


