Christmas tree of paper and tinsel do it yourself. Christmas tree from cones
In 1700, the decree of Peter the first celebration of the New Year began to be celebrated on January 1. With the same time, a dressed spruce became the invariable attribute of this holiday. In addition to the beautiful New Year's Tower, the decoration of the interior can be the Christmas tree made by their own hands. This article will consider several master classes, how to make a Christmas tree from Mishura do it yourself.
Wall decoration
The holiday is no longer around the corner, and the dimensions of your housing do not allow to put a forest beauty at home. What to do? Dont be upset! The Christmas tree can be hung on the wall. She will give you a festive mood and will not take much space.

To create a wall composition, you will need:
- tinsel green color;
- strength buttons;
- various decorations in your taste.
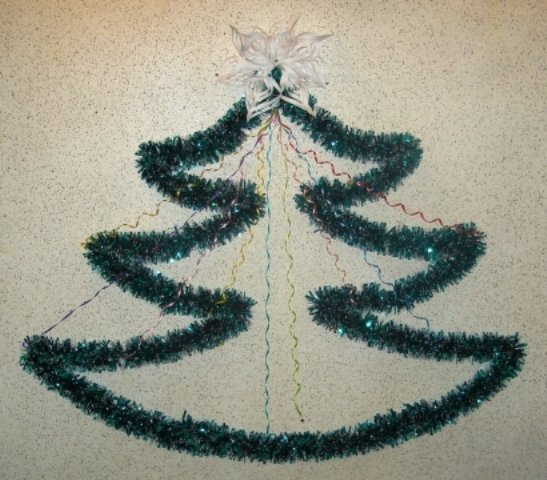
The process of manufacturing the Christmas tree from tinsel is quite simple. On the proposed place for placing the composition you need to make an outline in the form of a Christmas tree with a simple pencil. Then punctured the contour of the sketch of Mishur.
In order not to spoil the wall, it is better to do this using the power buttons.
Decorate the Christmas tree at your request.
If you want to make such a composition, it is better to use the framework. The second Christmas tree will be made from Mishura and Watman. For its manufacture, take:
- Whatman;
- Tinsel;
- Glue pistol;
- Jewelry;
- Scissors;
- Simple pencil.
Here everything is also quite simple. On the sheet of Watman, draw the outline of the future Christmas tree. Cut it. With the help of adhesive guns, fill in the entire space of the painted Christmas tree with Mishur, starting with the contour. Finishing the Christmas tree decorate to your taste. The advantage of such a Christmas tree in the possibility of its reusable use. It is possible to strengthen it on the wall using the buttons.
Outdoor Christmas tree
If you suffer allergies and can not afford to put a live fir tree at home, use the next master class to create an unusual artificial Christmas tree.
To work you will need:
- Several watman sheets (their quantity depends on the desired product size);
- Glue;
- Scissors;
- Simple pencil and rope;
- Many tiny color desired;
- Hot glue;
- Decorations.
First of all, you need to make the base in the form of a cone. Spread Watman's sheets with scotch tape or glue. With the help of a pencil and ropes, draw a large circle on them. Using the scheme proposed below, make a conical base.

When the basis is ready, you can begin to finish with Mishur. It must be glued to the paper base with hot glue or PVA glue.


The finished Christmas tree needs to decorate with christmas toys. A small Christmas tree of tinsel and paper can be decorated with a window or a New Year's table, and use a great use as a full-fledged artificial fir.

Creative solution
If you wanted something unusual, try to make a Christmas tree from tinsel and wire. Such a Christmas tree, guests will still look at and be interested in your creative idea. For the manufacture of the Christmas tree you will need:
- About meter thick wire;
- Hot glue;
- Scissors;
- Thin tinsel;
- Foam cone of the desired size;
- Decorations.
It is most convenient to do such a Christmas tree with a foam cone. Take the cone and conserve it with wire. Make the turns you need. With the help of hot glue, strengthen tinsel on the wire frame and start winding it on the wire blank. Do this operation until the tip of the wire, lining, if necessary. Finished Christmas tree decorate at your request. Such an unusual solution can serve as an excellent decoration of a table or a festive corner and a very creative gift.

And you can make even more creativity in the house and make an outdoor composition in the form of a wire Christmas tree.

Sweet a gift
What a holiday without a sweetheart? Please your favorite sweet tech with an unusual gift - Christmas tree from tinsel and candy.
The basis of such an unusual craft is based on a conical basis. It can be purchased in stores of goods for creativity and needlework. They make such cones from the foam, they are very light and stable. And you can make it yourself. Just roll the cardboard sheet with a cule, secure the stapler and cut the surplus on the base of the cone.

The base is done, you can proceed to work. For your crafts, you will need:
- The base of the conical shape;
- Scissors;
- Double sided tape;
- Candy.
The new year is approaching. Gradually, everything around begins glowing, sparkling, beautifully overflow with bright lights. Soon you will need to dress up a Christmas tree! And if it is not, how to be? Of course you need to make it yourself!
A beautiful Christmas tree will be decorated with a children's room or a common room, a class at school or a children's group in kindergarten.
New Year tree with your own hands From cardboard and tinsel - is done in a couple of hours! And the mood creates a new year for a few weeks! This Christmas tree can be done with the children. Adults can make the main design, and children decorate the New Year's beauty. Such a Christmas tree can and will need to be installed on a prominent place and let him please us and creates a New Year's mood!
We need:
- cardboard or Watman Sheet, you can also use a cardboard box from under household appliances;
- scissors;
- glue;
- scotch;
- stapler;
- mishur a couple of meters;
- new Year's toys several pieces of small balls.
For the decoration of the Christmas tree, christmas decorations will be needed. Look at what beautiful can be done on your own. You can also make it, which will decorate not only the Christmas tree, they can create an additional New Year's beauty in the interior.
Making a Christmas tree with their own hands

First you need to make a frame for the future Christmas tree. It can be done in two ways:
1) from Watman or Cardboard make a cone. To do this, cut the triangular form item and connect the sides so that the cone is for the Christmas tree.
2) make three rings from cardboard: large, medium and small. And connect them vertically straight strips from the same cardboard.
When your cone is ready, you need to hurt tinsel, connecting it with a cone with a stapler or scotch. Mishuur need to wipe on a spiral.
At the top, consolidating tinsel, you will need to decorate our Christmas tree. You can decorate miniature Christmas toys, small balls, bows, thread from New Year's beads. At the end, you can decorate the Christmas tree with a garland. And in the evening she will light up and fill the children's room with special magic!
Look the same and others that can be done with kids on holidays.
Very simple and affordable handicrafts for the New Year will bring you pleasure from creating such beauty, as well as create a New Year's Magic Mood for all holidays.
Have a nice New Year's mood!
Yours faithfully, .
It's getting closer and closer and you already probably put an elegant fluffy Christmas tree. One New Year Beauty can not be limited, and make it yourself a beautiful Christmas tree from tinsel and cardboard, which can decorate the New Year's table.
To create such a Christmas tree, we need:
tinsel green or any other color;
scotch ordinary and bilateral;
shiny packaging paper;
semobusin;
top for tree.
Tree from Mishura: Master Class
So, for starters, take a tight cardboard and turn the IHO to the cone. It will be the basis for the tree.
Shuffle on the cone tape sticky side up.

At the top of the cone, fasten the tip of the tinsel and slowly begin to wipe it around the base for the Christmas tree. Try to do everything carefully, not leaving the gaps.

Now let's make bows - decoration for Christmas tree. Cut the shiny on the same squares.

Over the edges from two sides and secure them with scotch. So the bow will look more lush and neat.

Take the middle of the thread, do trust unnecessary. Stick in the center of the semi-sink.
With the help of bilateral scotch, attach a bows to the Christmas tree, decorate the top.


"Masterclass" © 2011-2016.
All articles on the site copyright, copying is strictly prohibited. With partial quoting, the direct indexed link to the site "Masterclasses" is required.
The new year is approaching. Gradually, everything around begins glowing, sparkling, beautifully overflow with bright lights. Soon you will need to dress up a Christmas tree! And if it is not, how to be? Of course you need to make it yourself!
A beautiful Christmas tree will be decorated with a children's room or a common room, a class at school or a children's group in kindergarten.
New Year tree with your own hands From cardboard and tinsel - is done in a couple of hours! And the mood creates a new year for a few weeks! This Christmas tree can be done with the children. Adults can make the main design, and children decorate the New Year's beauty. Such a Christmas tree can and will need to be installed on a prominent place and let him please us and creates a New Year's mood!
We need:
- cardboard or Watman Sheet, you can also use a cardboard box from under household appliances;
- scissors;
- glue;
- scotch;
- stapler;
- mishur a couple of meters;
- new Year's toys several pieces of small balls.
For the decoration of the Christmas tree, christmas decorations will be needed. Look at what beautiful can be done on your own. You can also make it, which will decorate not only the Christmas tree, they can create an additional New Year's beauty in the interior.
Making a Christmas tree with their own hands

First you need to make a frame for the future Christmas tree. It can be done in two ways:
1) from Watman or Cardboard make a cone. To do this, cut the triangular form item and connect the sides so that the cone is for the Christmas tree.
2) make three rings from cardboard: large, medium and small. And connect them vertically straight strips from the same cardboard.
When your cone is ready, you need to hurt tinsel, connecting it with a cone with a stapler or scotch. Mishuur need to wipe on a spiral.
At the top, consolidating tinsel, you will need to decorate our Christmas tree. You can decorate miniature Christmas toys, small balls, bows, thread from New Year's beads. At the end, you can decorate the Christmas tree with a garland. And in the evening she will light up and fill the children's room with special magic!
Look the same and others that can be done with kids on holidays.
Very simple and affordable handicrafts for the New Year will bring you pleasure from creating such beauty, as well as create a New Year's Magic Mood for all holidays.
Have a nice New Year's mood!
Yours faithfully, .
The Christmas tree is a traditional triumph attribute, there is no possibility or desire to use a real live fir and its images from various materials are quite capable of replacing the original, creating a festive mood. There are several options how to make a Christmas tree from Mishura with your own hands. We will look at how to make a Christmas tree from Mishura do it yourself.
Christmas tree on the wall
The wall applique is performed quickly with a few stationery or furniture stapler. Schedule the contour simply attach tinsel in the main points to the wall, so that the material saves just in the sections of the bends. Decorate the Christmas tree with a star and rain. Thus, in 10 minutes, the interior of the office cabinet becomes more elegant, festive. The size and color of tinsel are selected on the spot on the wall.
The volumetric applique on the wall will require a little longer time and materials. First you need to make a framework. The easiest way to use the usual cardboard, suitable in size or assemble the basis of several pieces of thick paper, a fastened cloth or the same paper using a stapler. On the reverse side of the crafts you need to foresee a loop so that you can hang the Christmas tree anywhere where it will want. Fix with tinsel with threads, glue or stapler first around the perimeter of the frame, and after the space is filled with it inside. The volumetric tree on a rigid frame of paper is able to withstand a small garland and several Christmas decorations.

Souvenir Christmas tree
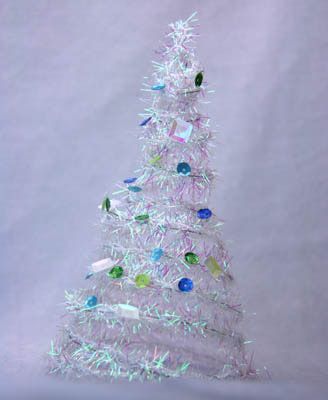
How do you like the Christmas tree as a souvenir or decoration on the desktop? Volumetric board Christmas trees are made on a cone-shaped frame from Watman, wallpaper or tight paper. A quarter or half of a circle with a radius equal to the height of the planned craft and twisted relative to the center, gluing the edges. Next, tinsel is fixed with clips at the base of the cone and screw, fixing the glue, to the vertex itself, where they are fixed with threads or clips. On the Christmas tree, you can stick decorations from paper, beads, small Christmas tree toys.

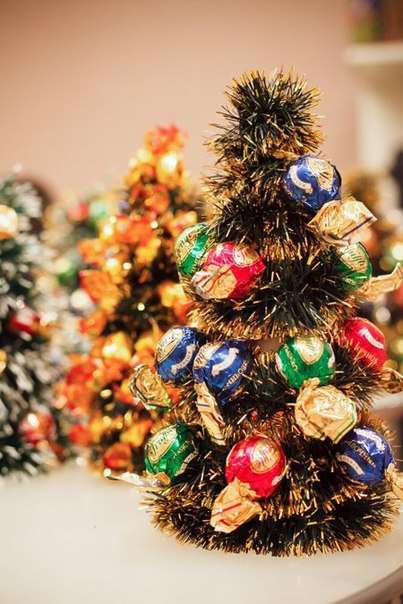
"Candy" Christmas tree - a great gift
The souvenir Christmas tree can also be "sweetened", having placed various candies to the cone carcass with the help of a scotch. Christmas tree of sweets will delight any child and adult sweet tooth. It is possible to make such a gift for several simple steps:
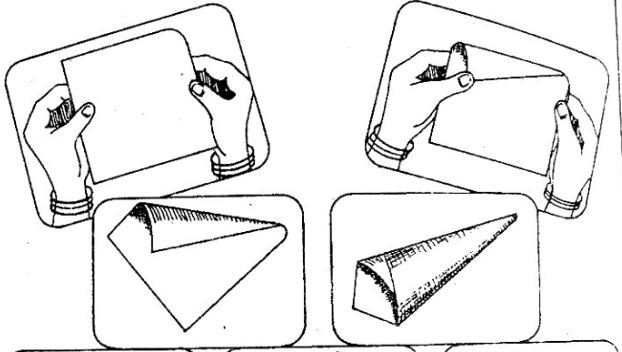
- Prepare a conical frame as shown in the figures above.
- The first row of tinsel is to secure PVA glue or transparent scotch.
- Using a sticky tape to raise the garland of sweets.
4-7. A number of closer to Mishuur alternately with candy garlands
- Last row of tinsel fix with thread or paper
You can pick up the color of the wrapper and the size of the candies and create a completely "candy" original Christmas tree, decorating it with Mishur. The basis of such a tree can serve a piece of carved wire.
With the help of the needle and threads of candy tie rows and secure on the wire. Please note that you have to tie a little candy inside the tree to give the volume of the craft. The top rows of sweets can be simply rolled on the wire pre-taking holes in the phantics needle, scissors or seats. The top of the wire is necessary to close with some cap, it is best to fix a small decorative Christmas starf plasticine. Between the sweets, lay a multicolored tinsel in several rows to give the Christmas tree of additional puff and gloss. The Christmas tree made in this way, it is advisable to place on the stand so that the sweets do not hide.

Wire frame
The version of the tree from the wire and tinsel will require a little snarling and the presence of the wire itself of the desired rigidity and diameter. The trunk from the thick durable wire is fixed on a tree or plywood stand. It is fixed to it a thinner wire in the form of a funnel with a spiral. It will not be difficult to build such a funnel, you just need to carefully wrap the wire on the helix on a solid base, for example, on the table, and then pull out the center to give a volumetric conical form. From the long thick wire, you can cook the frame without a stand and the "trunk", as shown in the figure. Mishur, toys and other decorations are attached to such a wire skeleton.

Christmas tree from cones

To work you will need:
- Several watman sheets (their quantity depends on the desired product size);
- Glue;
- Scissors;
- Simple pencil and rope;
- Many tiny color desired;
- Hot glue;
- Decorations.
First of all, you need to make the base in the form of a cone. Spread Watman's sheets with scotch tape or glue. With the help of a pencil and ropes, draw a large circle on them. Using the scheme proposed below, make a conical base.

When the basis is ready, you can begin to finish with Mishur. It must be glued to the paper base with hot glue or PVA glue.


The finished Christmas tree needs to decorate with christmas toys. A small Christmas tree of tinsel and paper can be decorated with a window or a New Year's table, and use a great use as a full-fledged artificial fir.


Creative solution
If you wanted something unusual, try to make a Christmas tree from tinsel and wire. Such a Christmas tree, guests will still look at and be interested in your creative idea. For the manufacture of the Christmas tree you will need:
- About meter thick wire;
- Hot glue;
- Scissors;
- Thin tinsel;
- Foam cone of the desired size;
- Decorations.
It is most convenient to do such a Christmas tree with a foam cone. Take the cone and conserve it with wire. Make the turns you need. With the help of hot glue, strengthen tinsel on the wire frame and start winding it on the wire blank. Do this operation until the tip of the wire, lining, if necessary. Finished Christmas tree decorate at your request. Such an unusual solution can serve as an excellent decoration of a table or a festive corner and a very creative gift.
And you can make even more creativity in the house and make an outdoor composition in the form of a wire Christmas tree.

Sweet a gift
What a holiday without a sweetheart? Please your favorite sweet tech with an unusual gift - Christmas tree from tinsel and candy.
The basis of such an unusual craft is based on a conical basis. It can be purchased in stores of goods for creativity and needlework. They make such cones from the foam, they are very light and stable. And you can make it yourself. Just roll the cardboard sheet with a cule, secure the stapler and cut the surplus on the base of the cone.

The base is done, you can proceed to work. For your crafts, you will need:
- The base of the conical shape;
- Scissors;
- Double sided tape;
- Candy.
Perform work Start the cone from below. Route bilateral scotch in a circle and strengthen tinsel on it.

Stick the second row of tape and strengthen candy on it. Next again a number of tinsel. Fill the cone to the top of the top.

Sweet Christmas tree of tinsel and candy ready!
Video on the topic
A small selection of video will help you create even more beautiful Christmas trees from Mishura. Enjoy your creativity!
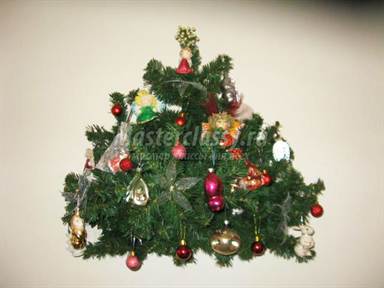
It turns out that the New Year's decorations made of foil are able not only to decorate the real festive village, but also become an independent decor element. From the New Year rain, original - Christmas trees are obtained. Looking in advance, show what we are talking about. Here our green beauty decorated the desk in the office.
The presented version used tinsel green with red edges. However, believe me, no less festively looks like the same tree, made of silver rain. It is believed that it is covered with an innese or first snow.
So, for the crafts, we get:
- tinsel green or silver
- Wire
- 20-30 cm Narrow Satin Ribbon
- Super glue
- scissors
- needle with threads.

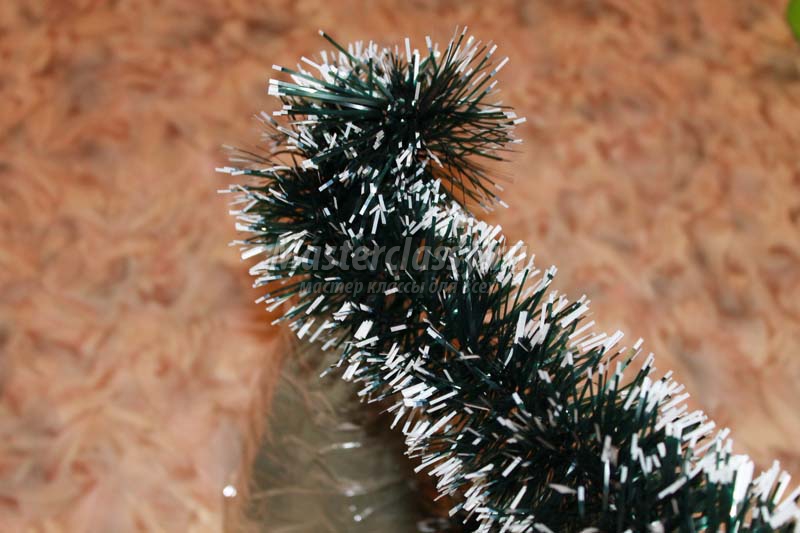
At the first stage, we twist the wire into the spiral, giving it the form of the cone. In our case, the wire is very coarse, the curls had to form the pliers with the help of pliers. However, such a rigidity of the frame in the end will benefit everyone. The tree is sustainable and not prone to deformation.

The figure shows that the circumference of the spiral is far from the ideal. There is nothing terrible. Mishur will hide possible angularity and irregularities.

Frame ready. Now it is necessary to wrap it with green needles. Work to start from the bottom edge. To attach the edge of Mishura to the wire, you can use superclauses, however, we decided to use threads. They simply tied the rain to the metal, the extra centimeters of the threads were removed with scissors.

I focus on the white thread nodule. Carefully wind the wire Mishuro to the top of the top.
Special symbols and interesting traditions have all holidays, they allow you to be distinguished by these days from the usual gray days. Thanks to such traditional characters, a pre-holiday mood is created. Despite the fact that different nations have some differences in the celebration of the New Year, attributes remain the same for everyone. For example, New Year's holiday is one of the most beloved in adults and children for many nations. The main symbol of the holiday in all countries is a fluffy Christmas tree decorated with various objects. The tradition of dressing the Christmas tree originated among the German peoples and gradually spread throughout the world. The Christmas tree became the attribute of New Year's parties, matinees and corporate events. But the tradition slightly changed: now you can see on the eve of the holiday, you can not only a live tree, but also its analogues, for which any technicrafts are used. In the conditions of the house, the tree is made of everything that will come up with: magazines, natural materials, "rain", cones, New Year toys and a lot of different. You can build a Christmas tree with your own hands from a different material, let's see more about how to implement it.
Variety options
Christmas tree without a Christmas tree - a new trend that pursues specific goals: to save a live plant, decorate the room in your taste. To perform it, you can apply one of the many techniques presented on the Internet. How the Christmas tree is done with their own hands, step by step instructions will tell you on the Internet.
It is advisable to attract your child to making a Christmas tree and have fun, catching it to work, developing aesthetic taste.
Make a Christmas tree with its own forces is easy. Material should be prepared, examine the theoretical side of the issue and allocate time for a non-sufficient procedure. Consider the most common techniques and features of performance.
Idle Christmas tree with your own hands for a child in an educational institution
This option is ideal for making in a kindergarten when a question arises about compulsory participation in the competition or prepare for the holiday. It does not require high time costs, because it is characterized by simplicity. You can also build small Christmas trees in this technique as a gift for other family members. Consider how to make a Christmas tree with your own hands, spending my minimum effort and time.
It will be necessary to stock the necessary materials:
- a4 format sheet;
- scissors;
- beautiful napkins or double-sided colored paper;
- glue white;
- stapler.
To build a new year, you will need to perform a number of consecutive actions:
1. Initially, it is necessary to make a paper housing. It is cut out of the A4 sheet. The semicircle can be arbitrary size, which one suits you.
2. The workpiece should be folded into a dense cone and connect the stapler. Alternatively, the sides can be punctured, but they must be strengthened before drying.
3. When the base is ready for further work, go to the decoration of the Christmas tree.
4. To create Christmas branches, rectangles from napkins or colored paper are cut by fringe. To grind paper faster, you need to use special scissors for cutting greenery.
5. The tiers begin to do from the bottom, gradually rising to the top of the Christmas tree.
6. It is necessary to control that the upper fringe bed covers the lower tier half. In this case, the finished Christmas tree will be fluffy and very pretty.
This option is very simple, so you can safely try to make such Christmas trees with your own hands for the new year.
Christmas tree on New Year's holidays from threads
A simple, but very original option, allowing you to make a Christmas tree with your own threads - a simple way to create a real masterpiece. For the manufacture of crafts, you will need to prepare the following materials:
- threads of green;
- needle;
- white glue;
- scissors;
- new Year decoration.
To make a Christmas tree yourself, you need to perform simple sequential steps:
- For the manufacture of crafts, dense threads are suitable. Knitting threads are not quite a convenient option, in which case, the heart of the Christmas tree should be very dense paper, cardboard, the usual paper does not fit.
- It is necessary to make a semicircle and roll it into the cone.
- We produce a thread in the needle, we carry out through a tube with glue and wind up the tank of the christmas tree.
- So that the finished Christmas tree was dense and kept the shape, the winting of the thread occurs randomly, tight.
- When the threads are wound, they are cut off and for some time the Christmas tree just dries.
- Then paper cone is carefully removed from the product, it is important not to disturb the integrity of the crafts.
- The billet decorates at your discretion: beads, rain, beads and similar.
The simplest ways of making a Christmas tree
Some methods allow you to make a new year symbol for a quarter of an hour, while not required to purchase special materials: everything that is found in the house is used. The Christmas tree with your own hands is cute, beautiful and unusual.
| Christmas tree from cotton disks. | The real beauty can be made of cotton disks. To work, you will need to collect: packing discs, stapler, glue, decoration, dense paper.
|
| Christmas tree from tinsel. | The value of the material is kopeck, temporary costs are minimal - and the finished product looks very attractive. For the Christmas tree, the cone from the cardboard will be mastered. The features of its manufacture are described above. Mishur is glued to the surface of the cone, copes well with the task of the adhesive gun, but if it is not - it is quite suitable for glue with a tassel. You can use a monophonic tinsel or different shade. As a rule, green color is used, but there are no restrictions - you can come up with a variety of compositions and combine different colors. |
| Christmas tree from candy. | This option becomes not only an unusual decoration on holidays, but also is an original and delicious gift. To make a craft, you will also need to make a conical base from dense cardboard. It needs to consolidate candy with the help of scotch. After that, the Christmas tree is wounded by Mishur. You can make a tier: a row of candies, a number of tinsel. |
Volumetric tree.
A Christmas tree will become an excellent decoration of the children's room for New Year's holidays. Making such a craft is very easy, the main thing is to prepare the necessary material and tools:
- Tight green cardboard.
- Feltolsters.
- Paints.
- Decoring material.
- Scissors, stationery knife.
- Scotch.
- Glue.
The Christmas tree making algorithm looks like this:
- Cardboard must be bent in half and cut into the center with scissors.
- Two cut halves need to be folded together and bend off again in half.
- On the other hand, the felt-faucer films draw halves of the Christmas trees.
- Over the contour, two Christmas trees are cut out, which are completely identical.
- Each of the plants should be proceeded in half and outline the center.
- On one part of the tree, an incision is made half: bottom to the central part, the second tree is cut from above and to the central part.
- After that, the Christmas trees are inserted into the cuts and combine into one tree.
- For greater stability, we strengthen the Christmas tree with scotch.
You can decorate the Christmas tree with any materials to your liking. How to make a Christmas tree with your own hands master class on the Internet will tell me.
Christmas tree from New Year's balls
Create an original Christmas tree, a new year unchanged attribute, you can from Christmas balls. Use balls of different diameters. They are perfectly combined and attractively look. If the tree is made to decorate the child's room, it is important to think about safety and decorate non-glass, but plastic balls.
For crafts, you need quite a bit:
- toy balls of different sizes;
- sequins;
- glue;
- conise base.
Consider the moment that the fastening is removed from each ball.
The algorithm for making crafts looks like this:
- it is necessary to sell a soft basis to form a socket for connecting a ball;
- when each toy one tier is recessed, they are removed, and the base of the balls is melted with glue;
- balls are attached to their nests;
- having made the first row, it makes a similar one with each subsequent;
- all the workpiece is applied by balls, and the lumens between them are filled with beads.

Christmas trees from ribbons, fabrics, lace
Luxury crafts are obtained from laces, which are beautiful in themselves, without any additional jewelry. The basis for such a Christmas tree is dense paper, cardboard. Lace can be combined with each other, complement and component.
Each hostess is probably the patchworks that lie idle. Of these, you can make a pretty Christmas tree. Alternatively, the use of felt. It is easy to work, does not slip, without any problems, holds the form and is not dissolved. Water paws can be decorated with simple materials and turn the craft into a real masterpiece.
With the help of fur and feathers, the Christmas tree made will definitely be unique and original. For the Christmas tree, the basis and most different material will be needed. Feathers It is advisable to take large, fluffy.
For making crafts, you will need to prepare such materials and tools:
- satin tapes of several shades;
- scissors;
- cardboard;
- glue.
Successful work will be achieved subject to these rules:
- a cone is made from cardboard, which glued or connects to the stapler;
- the ribbon is cut into small fragments of ten and fifteen centimeters long;
- from each fragment it is necessary to make a loop, the connection locations are fixed using glue;
- ready tape billets are attached to the base of the product from below-up in a circle;
- to the tapes look very beautiful, and the Christmas tree was bright, it is desirable to alternate several colors of the tapes;
- fill in all the base loops from ribbons, it is necessary to give a product to dry;
- if you want, you can decorate the Christmas tree with rhinestones or beads.

Production of analogs of the Christmas tree
There are other, simple and pretty making trees. One of the common ways is to use Christmas tree toys. With their help, you can display a New Year's character on any horizontal surface. This is the simplest way to manufacture a Christmas tree, but you can also make a bulk composition. To do this, new year toys need to hang on a transparent fishing line - this will create the illusion of the saving in the air.
It is also possible to paint the Christmas tree on the wall or window, and then decorate with toys or tinsel. Another option - with the help of garlands you can make the shape of a Christmas tree on the wall. A simple variant allows you to make a festive look.
From jewelry, existing in every woman in large quantities, easy to make a Christmas tree. On the basis that are most often made from cardboard, rings, earrings or bracelets are attached.
Christmas trees from natural material
A Christmas tree of cones look very nice. Even a small child can make it: a large bump is painted in green, decorated with beads, installed on a stand, you can attach a bump on the base with plasticine. If you do not want to paint, leave it in kind. This option also looks good.
From pine cones, you can build a real tree. If painting is not included in your plans, you do not need to decorate the village. As an option - flood the Christmas tree with artificial snow. It can be a foam crumb, flour, wool pieces sprinkled on glue-covered bumps. There is a little secret - if the concentrate of incense is dropped on the Christmas tree, aromomasla, then a pleasant smell will be felt in the room.
In nature, so much material that ideas for creativity never exhausted. Hollows can be made from spruce or pine needles, berers, roots and many things. If the bare twigs of the craft look dim, they can be decorated with toys, tinsel, beads.
Making a Christmas tree on the eve of the most beloved holidays - a wonderful reason to tune in for the upcoming event and recharge your positive.
Good day, friends!
Soon, soon the new year!
He is in a hurry, goes!
He will knock on the door to us:
"Children, hello, I'm to you!"
Holiday we meet
Christmas tree dressing up
Hinder toys
Balls, clappers ...
That's so unusual I decided to start today's note. Which will be devoted to making at home after all, we all traditionally love to give them to the New Year. Namely I propose to make a Christmas tree from what you have at hand. This can be anything, for example, paper, cotton discs, dry twigs, etc. After all, we all dream to surprise their loved ones and native something special and unique. Therefore, if you still think about to give mom, dad, etc. then you are a ready-made solution).
Of course, in every home stands on New Year's days, a brightly decorated Living "Forest Beauty", which flickers and blinks with multi-colored lights. I propose to make a "little girlfriend" so that she is not bored. And for one transformed your decor in the rooms, or maybe you will post it on the festive table.
In addition, this creative work will deliver a lot of positive emotions, and children will cause delight. Moreover, the winter evenings are long, and you can afford something to create a beautiful and green).
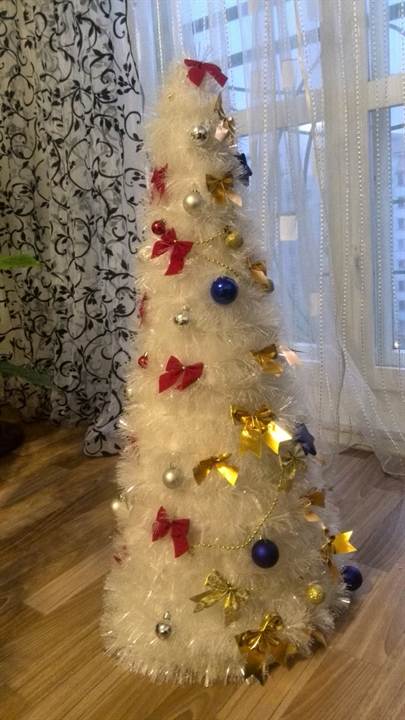
Although it is not necessarily like that color, white, too, in fashion. It will be a tree as if in the snow or more.
Perhaps, perhaps from the most grandiose and magic tree in my opinion. I suggest to look and explore this instruction to create yourself or someone as a souvenir such a funny and cheerful beauty. The work is made of Sizal, who does not know this coarse fiber of one tropical plant.
On a note. A feature of this craft is the presence of funny legs instead of a stand. And if they are removed, it will turn out already to the topiary, which can be made of any material, for example, coffee grains or threads.
Well, start to act, looking at these pictures and detailed description.

We need:
- sizal green - 25 g
- cinender Surprise Cases
- thermopystole
- styrofoam
- wire
- green pencil - 2 pcs.
- colored paper
- threads green
- decorative Tape
- any decorations for example balls, beads, etc.
- cardboard
Stages:
1. Take a cinder case and cut the closer. A little part cut a little segment with a segment on one side to glue.

2. Using the adhesive gun glue two parts with each other. Here is a booze, top top.

3. There should be two identical shoes. Do in the largest opening hole in the largest opener. Guess what it is necessary for?

4. Now reorganize shoes. To do this, take a sheet of red and cut two strips with a length of 19 cm, and a width - 2 cm.

5. Stick the longest strip, shifting it completely to the shoe and giving the desired shape.

6. Glue the decorative braid throughout the sole diameter for a beautiful appearance.

7. Then take pencils.
8. Head them into the prepared holes, and a little bit of glue so that they hold firmly. The legs are almost ready.


9. It remains to decorate them with tinsel, do the same as shown in this photo below.


11. That's what should go out. What reminds already?

12. Now take the wire and insert it into the tip of the cone. Wrap it, too, is syzal and tie the thread.

13. The next step will take a skirt for the topotting. To do this, you need to make functions. From the fabric, make rectangles with a size of 10 cm x 9 cm, their quantity should be from 60-80 pcs. Depending on the puff of the skirt.

14. After start gluing a thermopystole. In such a sequence. Bend the rectangle as if in half, but on the oblique line. Lock glue.


16. After lift the right edge and glue.

17. Funtik is ready. True the fun name, even funny slightly.

18. After that, start assembling the Christmas tree. Stick the blanks in a circle.

19. In order to succeed in the subsequent skirmon.

20. Insert into the bottom of the leg.

21. Then connect the imagination and create, glue a different kind of decoration.

22. On the top of the fir ride a bow with beads, wrap the craft.

23. There will be more snowflakes and rhinestones. Put the resulting masterpiece on the stand. Good luck.

How to make a bulk Christmas tree from paper at home
I think that many ever thought about this issue. After all, it is often and in schools and kindergartens give assignments in this subject. I propose to make a silfochka for example. To do this, take this sample and print on office colored sheets.

After cutting out the stationery and blanks, glue with each other. Use special clamps for this.

You can make a whole forest of such coniferous multicolored beauties.

The next job will be performed in 5 minutes. Do not believe? It does not happen easier, you will need circles from colored double-sided paper and pencil on the stand. Diameter of blanks, you see below:

1. Fold the circle with hands in half, so that it turned out a semicircle.
Do this way! Carefully swing a fold.

2. Now the semicircle reappears in half.


4. And in the same way twice.

6. And that's what happens. The tips at each workpiece neatly cut the scissors.

7. Start assembling the product. All billets are dressed on a wand. From the biggest mug to the smallest.


8. There is not enough stars well or Santa Claus.

For you, I specifically found such a video so that if you need, you could still add to the grandfather from the paper. A new note will soon be released, in which you will find many works with this hero, but for while watching the plot.
For those whom the first option seemed pretty light and simple, you can take and fold the Origami-style Christmas tree, the instruction and description below in this film.
New Year tree of beads for beginners (scheme inside)
The next creation of nature, Wow and cool and at the same time immediately elegant. And such a souvenir eats such a decade. This is a spruce of beads. I thought it was impossible to make such a tree. And as it turned out I was wrong. I am sure you will handle with such a work.

We need:
- green beads - 7 shades
- white beads or transparent
- kashpo plate
- acrylic paint: white and brown
- wire 0.4 mm
- pVA glue
- rule
- 4 mm rod and 2 cm long
- teip-tape.
- alabaster

1. Place the beads in a cup, mix all the colors. On the wire, the balls in different sequences in color and measure the 2,5 cm tool. At the same time, leave the edge in the area of \u200b\u200b5-7 cm without beads.

2. Make a loop for four circular turns.

3. From the loopback, retreat 2 cm wire free and without wire beads and cut 2.5 cm again and make a loop.

4. For the smallest twig, then turn 7 penets. After that, find the middle and fold in half and twist the elements among themselves.


5. Thus, you should have such a number of twigs.


7. Take the rod now and take a teip-tape, and after it is 4 branches, which have 7 kettops. The first in the center, and the rest lay out below in a circle, twist the wand and wind up the ribbon.

6. Next, take 6 twigs of 9 kettops. Adjust them in a circle in two tiers of three twigs, lay down in a circle. Then back down about 7 mm and take 5 twigs of 11 kettles and dive them into one tier.

7. Rate 7 mm again and take 6 twigs of 11 kettles and divide them again into two tiers. Etc. The final stage is 5 twigs of 7 loops.
The remaining trunk is rewinding the brown step tape. Pour the branches so that the Christmas tree turns out lush.

8. Bend the table at 90 degrees and place it in a cup of caspo. Pour the solution of alabaster in it and let dry.

9. Wait until the tree grabs, you can also plant any symbol of the new year. For example, a pig or rat.
From the glue of PVA and Alabastra, make a thick solution, dry the kitchen napkin and stick to the trunk. To get a natural look.

10. After complete pouring, proceed to the color, but first pull out the product from the cup. Color the trunk of brown paint, and the playground is white.

11. Decorate large beads in the form of toys or something else.

Now some more instructions that were found by me on the Internet.


But this model is similar to something on the first, suddenly someone will like this anymore.


But still see what charm.

Well, in conclusion, I want to still show one example of a flat fir, which you can use in the form of a snap or keychain.


Christmas tree in the style of Kanzashi from satin ribbon
Well, friends now reached one more elegant version, which looks pretty bright and smart. Green beauty turns beautiful and lush. But, first, you must learn the technique of Kanzashi, for this you need to learn how to make special blanks in the form of triangles. Take a look at the scheme, if it is not clear, then you will find a more detailed master class on the manufacture of such things.
You have to take the satin ribbon of green color, cut it into pieces of 5 cm x 5 cm and repeat all these actions.

Or consider this tip.

In this way you will need:
- dense paper or cardboard cone
- satin tape
- star
- scissors
- wire
- candle
- thermopystole

Stages:
1. Prepare everything you need to work. Put the gun on heating.

2. To the surface of the green cone, it is neat and not in a hurry to stick the tissue blanks in a circle and spiral.

3. Try all the triangles have pretty close to each other. After the product is ready take the star or any bow and stick it to the wire.

4. Insert the decoration on the top of the eutle. Decorate souvenir beads, they will perform the role of garlands.

A more simplified version of the crafts I met in this film, perhaps you will also like it and, along with children, master this technique. Good luck!
Fir from cotton disks: Crafts for children of kindergarten
Now let's get acquainted with a pretty simple craft that you can easily do with a child at home or in kindergarten in the classroom. This option is such a light, which is suitable for any youngest group or senior.
For creativity you will need to decorate cotton wheels with green gouache. Give them to dry completely. After turning into such a petal, lock the glue.

Since the Christmas tree is usually done for the new year, then let's glue the drifts on a sheet of blue background first of all. And after already placing and glue green blanks in the desired sequence.
You can also dream and build a snowman or other character. Give the will of fantasy and souvenir or postcard will be ready.


It is such such triangular billets that you can construct other options.


The following option for which the materials you see in this picture will be needed. From cardboard Move the cakes, glue parts by double-sided tape, and the bottom to be smooth.

And after the blue gouache in the water and make a cotton wand in it. Draw points along the disk contour.

Then glue the busbars on the cone, overlapping one on another.

After that, decorate the craft to your taste. Winter beauty is ready. How do youka and you? True super and fast and cool!

You can go another other way, each disk fold three times in half, and secure the stapler. Then glue such triangles on a white cone. And then make a Christmas tree by beads and a star.

And you can still go to another way, perform a bulk cracker, cutting your cotton disc into four equal parts. See all ourselves below:

The youngest assistants can be offered to fulfill such work.

Forest beauty from spruce and pine cones
Of course, no New Year holiday is still without tangerines and of course cones. So why not use it either. After all, such a natural material is easy to choose in the forest or park, and then sit down and crawl.
We need:
- pistol
- scissors
- cardboard
- shishki.
- varnish in the balloon

Stages:
1. From the sheet of paper A4, make a cone, glue the ends. I remind you how to execute it. Draw a circle, and then cut it out in half, lubricate the walls with glue and let dry.


2. After start collecting the product, stick to the billet on the spiral of the bumps. So as long as the product does not get a finished look.


3. Cover the brilliant varnish for durability.

4. From a shiny lid or any other material cut out the asterisk.

5. Take the top.

You can go another other way and fulfill such a forest charm of husk. Also glue a cone from paper.

And it is on it that, with the help of an adhesive gun, glue the particles on the spirals after each other.

For completion, place beads or other decorations that are inherent in this holiday. For example, Mishur and asterisks.

Christmas tree from candy (phased instruction)
Love sweets? Oh, and I just adore them. I suggest from them to lay out a symbol of the new year, and in the role of the base, take a bottle of champagne.
1. Green fluffy tinsel stick to champagne on the helix using a glue gun.

2. As soon as it is glued with the first row of tinsel glue in one distance with candy candy.

3. And then add something else, for example a bow.

4. Well, how do you like a miracle idea? Cool, bravo author! With such a souvenir and not ashamed to go to visit).

Tree from sisal with your own hands
Preparation in the new year in full swing, so let's do something interesting from such a material as a rough fiber. Now it was often used to be used because it is not very expensive, and I want to create from it.
We need:
- siseline fiber green and white
- filler
- bamboo stick
- plastic cup
- cardboard
- satin tape
- scissors
- decor elements: Bows
1. From the Cardboard Sheet, fold the cone and glue. In it lays the filler and insert the wand. The wand will need to reap the satin ribbon. Secure the ends of the ribbon glue.

2. In the cup also make a filler, put something hard on the bottom, such as coins. With the help of corrugated paper or other material, make a glass, it will act as a stand. You can also put a piece of foam rubber from above, for strength and in it make a hole for the stick.
In the stand insert the prepared cone on the stick.

3. From Sizal, roll in the hand balls.

4. Stick them to the workpiece in different combinations, I mean color. Alternate at your discretion.

5. Now dress your beautiful and slightly sprinkle with brilliant varnish. It remains to admire or someone to give this masterpiece.

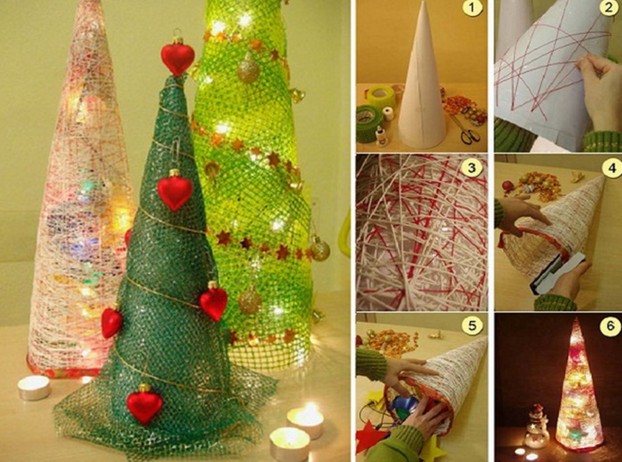
Video on how to make a decorative Christmas tree made of threads and glue PVA
And one more little beauty, which is very cool fit into any interior or becomes an excellent gift that a miracle of threads. See this plot and perform all the actions by the author.
The next option, I decided to register you, read, please.
We need:
- pVA glue
- thicks
- foil Scotch
- disposable cup
- cardboard or old box
- plastic bag
- candle on batteries

Stages:
1. From the cardboard to form a cone, glue with foil scotch. Dry. Then put on the geometric shape of the bag, fix it even inside, and then it will be on the billet.

2. Threads put in pva glue diluted with water (50 to 50). But before that, in a cup, right on the ground Make a hole and thread in it.

3. Fill the cup with adhesive mortar so that the whole thread is in the glue.

4. Now start winding the thread on the spiral.
Important! The thread should not be strongly stretched, it should be easily located on the surface of the cone.

3. Thus, in the end, you will get a new souvenir, cut the thread. Leave dried.

4. After drying, remove the Christmas tree from the workpiece, the PVA will dry and will become transparent.

5. Decorate the gift by sequins and then turn on the candle on the batteries and lay it on the basics.

6. The Christmas tree will flicker and will fulfill the role of a mini-line or garland.

Crafts for a competition to school "Tree from Mishura for the New Year 2019"
Now moving on and perform a symbol of next year with a conventional tinsel. All the same, such material is also an indispensable attribute. Do you agree? In addition, it turns out truly beautiful and charming. Take a look.
We need:
- mishur of different colors
- cardboard - 2 pcs.
- glass or pot
- foil sleeve
- pistol adhesive and plow glue
- scissors
- threads with needle
- wire
- any decorations, lace cloth, bell, balls, etc.

1. From cardboard Perform a cone, take it green.

2. Then cut the circle from another sheet, more than the diameter of the geometric figure by 1.5-2 cm.

3. Then do it these slots.

4. On the round billet, circle in the middle of the sleeve so that you can cut the suitable hole.

5. Spread the circle with a cone. That's what happens in the end.

6. Cut the decorative ribbon and insert it into a glass with plaster.

7. From the lace, make a skirmon, collect with a needle with a thread so that it turns out to be air and lush.

8. Sharpen into two tiers to the green billet. Cut the tip in the cone and insert the wire with the bell in it.

9. Now take the adhesive gun and you lock the spiral of Mishur.

10. Then glue balls and other decorations, such as beads. Your magic miracle is ready. Create on health!

Dimaster class for the manufacture of the New Year's Tower from Foamiran
If you want something unusual, I am glad to introduce you to another green joy. It will be needle, and the material will be used by Foamiran. He is rather unpretentious, it is easy to work with him and the most important advantage it does not appear. So that dare.
Do not forget to decorate the use of artificial snow, which will give a spruce well with unprecedented beauty and brightness.
Vintage crocheted paper Christmas tree
Now another exercise, which you can also take and perform to an exhibition in a kindergarten or school. Execution technique will be a carriage. Do you like this method? I hope very good. And if not, now you will learn. You need corrugated paper, PVA glue, scissors, and a cone from cardboard. And of course a good mood.
1. So, take the cone to work. It is his now that we will process.

2. But, before making the squares from the corrugations of the square: 1 cm x 1 cm, 2.5 cm x 2.5 cm, 3 cm x 3 cm, 4 cm x 4 cm, 5 cm x 5 cm, 6 cm x 6 cm.
You can replace corrugated paper to ordinary paper napkins.

3. Take a small square and wrap it around the stick, then lower it into the glue and stick to the cone.

4. In this way, fill in the entire geometric shape move in a circle.

5. Squares take first the smallest, then more and more in size.

6. You can also perform a star from the paper from the paper. Or, take a ready-made version from the store.


Here is such a wonderful green souvenir you must end up working out. Do not forget to decorate any beads or straps.

Creative fir of plastic bottles
I think that in any house there is a plastic bottle. Take her salad in color. Stages of execution are pretty simple, do together with children to take your family leisure.
Stages:
1. Cut from the bottles to cut the middle, and then cut it into pieces.

2. There should be such rectangles. Of which will be performed twigs for the Christmas tree. These sizes are:
- 8.5 cm x 6 cm - 6 pcs.
- 7 cm x 6cm - 6 pcs.
- 6.5 cm x 6cm - 5 pcs.
- 6 cm x 6 cm - 5 pcs.
- 5.5 cm x 6 cm - 4 pcs.
- 5 cm x 6 cm - 4 pcs.
- 4.5 cm x 5 cm - 3 pcs.
- 4 cm x 5 cm - 3 pcs.
- 3 cm x 3 cm - 3 pcs.

3. Each rectangle round the tip, and after the edge, do it, as shown below.

4. For co-korchevosti, they will fall out a fringe with a candle.

5. And then paint the baked acrylic paint or nail polish. Failure sparkles.

6. Thus, you must make such a number of twigs, and make a hole on each branch.

7. Then take a wand and stick it into the lower part of the bottle. This will be a souvenir stand. Hole using drill.

8. Well, and now it remains to collect a Christmas tree, grind on a wrench stick.

9. It looks elegant and attractive.

10. Curse the bows and beads. Give such a masterpiece to your friends or leave yourself for the New Year's table. Product height 20-25 cm. Class!

Christmas tree for the new year 2019 from submitted materials (100 ideas)
Time miracles came, and therefore, let's buy your apartment today. Which each of you can create yourself. For example, you can use this idea and decorate the walls in any room. Such a glorious exercise is a mood. You can make such a drawing in the school class and even a kindergarten hall. In principle, at least where, even in the office.


Such mounted Christmas trees look elegant, and they can be made of anything, like on these pictures. It can be chopsticks or even dishes, take a look:

Or place the figure by any lamps or New Year's garlands.

Cool looks souvenir on which your photos are posted and.

And also perform illumination. Wow, the spirit captures especially in the dark day, when evening or night.

You can add fir branches or perform work.


Even from ordinary magazine sheets, you can also create an elegant composition.

From ordinary leaves for notes you can also make a craft in the form of a Christmas tree, both bulk and on the door.

Fashionable now began to make compositions on the doors or walls. Here for example, from old bookcases:

But from the books themselves, even in stores make such wonderful scenery.

Again, looking at where you work, if the store of clothing and shoes, then you can disguise the mannequin like that.

In addition, you can also take out of the cast materials. Ordinary tubes from under wine and voila, a new masterpiece.


Or use the simplest idea - draw the Christmas tree.

Or make the desired figure on the template.


Well, if you are a completely creative person, you can even perform work from machine tires or plywood.

If you work in a hospital or specialty is associated with medicine. You can lay out in this way:

And from ordinary wooden dies it is also possible to create nothing beautiful, as shown in this picture.

You can also turn the usual stepladder into something very cool, take a look, what does it remind?


Even make presenting a Christmas tree from plastic or paper pipes.


And here is another souvenir from disposable plates.

Or lay out the fabric and modern glass balls.


Or use the bows.

For those who are fond of needlework (for example, you can take a foamiran or felt) or knitting:


From the New Year's toys, such cool things are laid out in a suspended state, which resemble a forest beauty.


Here we used the wire.

And here the cardboard frame was smart.


From ordinary napkins and newspaper also make crafts.


Or use the paper for scrapbooking.

Once I saw even a gorgeous creature from the molds from under the eggs.

You can also perform a masterpiece from pillows.


The most original crafts can designate these, from bottles.


And here is another idea of \u200b\u200bjelly jackets or take any containers.

With the kids you can easily make a Christmas tree of plasticine.

By the way, it is possible to create sweet masterpieces that are also edible. We will need waffle horns and cream.


But another beauty, which is made of sweets or cookies.


From fruits and berries you can create unusual souvenirs. I think that the kids from such beauty will not stand and immediately want to try to the tongue.


And here's another idea from Macaroni.

And do not even believe from disposable spoons and the forks create products.

And here is another work from woolen balls and buttons in the form of a cone.


And here see the seashells were used.

This masterpiece looks quite unusual. It is made of feathers.

Or from such a material like a flower mesh or sisal.
Here is another couple of ideas.


On this friends, I have everything. The post turned out quite large, but I hope that you found what they were looking for. Create yourself or together with children such wonderful decorative Christmas trees and be happy. After all, such a souvenir is always there and will be the main attribute of the new year.
I wish all your dreams and expectations to be completed in the near future. Good luck and great day! Until.