DIY paper crafts. Facing
Facing out of paper allows you to make fluffy crafts, extraordinarily beautiful three-dimensional paintings. In this technique, you can make postcards and even a topiary.
The content of the article:
Paper gives immense scope for creativity. They draw on it, fold it, making unusual crafts. You are already familiar with many of them, but not everyone knows about facing. This needlework technique is quite simple: pieces of paper are twisted and glued or attached to the base. The result is voluminous and airy compositions.
Paper trimming: technique, master classes

This needlework is of several types:
- contour. When twisted pieces of paper frame a drawing along a previously applied contour. This technique is sometimes used in conjunction with scrapbooking.
- On the plane. This is a facing technique in which workpieces are placed next to each other, filling the entire surface with them.
- When facing in layers parts are glued to each other. At the same time, the combination of elements of different shades helps to create interesting effects.
- Volumetric trimming most often made on the basis of plasticine. Twisted parts are attached to the molded workpiece, which allows you to make complex compositions.

To make such a violet, take:
- corrugated paper;
- a sheet of cardboard;
- simple pencil;
- scissors;
- bottle of glue with a spout.
To fold paper elements, you need to use a special stick for trimming. If you don’t have one, you can replace it with a pen case, sharpened with a pencil.
- With one of these tools, press a small paper blank in the center, wind it around a stick.
- Roll with your fingers without removing from this tool. Lubricate a small section of the contour with glue, attach a twisted blank here directly on a stick, carefully remove this tool.
- Create the second element in the same way, glue it next to the first. Having drawn up the contours, proceed to filling the inside of the petal.
- When blanks are glued to all the petals, twist the same elements from squares of yellow corrugated paper. Glue them to the center of the flower.

To make this work, take:
- bright napkins;
- scissors;
- a sheet of cardboard;
- gouache;
- stick for trimming.

On a white sheet of cardboard, draw the outline of a tree. Apply glue to a small area so that it does not have time to dry.

At this time, take a square from a napkin, wind it around the tip of the trimming stick, glue it to the smeared contour. Then glue another one and others.

Take napkins of different colors to make the tree bright and cheerful. Fill the entire crown, paint the trunk with brown gouache.

Since you made the foliage of the tree from elements of different colors, make the picture frame from napkins of the same color.

Make a background out of blue napkins. Elements for this are also created using the facing technique.

You will get a wonderful picture that will surprise and delight everyone who sees it.

Using this technique, children and adults can do many other amazing jobs by doing flat or contour trimming.

For this, corrugated paper of yellow, orange, lilac, green, white and blue color was used.
First, glue a sheet of blue paper on white cardboard, then draw the outlines of a fish, algae. After that, blanks for trimming are twisted from yellow squares, fill the tail of the fish with them. From orange make her body, from lilac head. And white and blue will create the eye of a fish. It remains to fill the algae with similar elements and admire the wonderful work.
See how you can make interesting crafts using another trimming technique.
Templates for volume crafts made of paper and plasticine

Such flowering cacti will also help create trimming. For these crafts, take:
- well-sharpened pencil;
- plasticine;
- corrugated paper;
- toothpick;
- packing tape or satin;
- a pin with a bead;
- colored cardboard.

Stick a toothpick into the cactus and the other end into the pot. Attach the flower base to the cactus. Fill his body with beautiful voluminous blanks. To do this, put a pencil in the center of the paper triangle, wrap it around the rod, stick it into the plasticine base.
Complete the first row, placing the elements close, then move on to the second and the next.

To make the petal the desired shape, leave its tip free, twist only the part that you will attach to the plasticine.

To decorate a flower, you need to make 1-2 such petals, then make its middle with triangular blanks of orange paper.

See how the pot is made. It must be wrapped with a strip of colored cardboard or wrapping paper and tied with a ribbon.

A cactus made using crepe paper trimming has been created.

Look at the process of making another work using volumetric technology. It will help the child develop creative thinking, fine motor skills, imagination. Children show interest in working with paper, as a result of which such wonderful models appear.

Prepare the following:
- corrugated paper;
- scissors;
- album sheet;
- pencil.

Spreading small areas with glue, let him attach squares here to make a fabulous rejuvenating apple.

You can draw a branch or glue a thin strip of brown paper instead.
You can glue one workpiece of a different color into an already attached one, thereby obtaining the effect of trimming in layers. The next two works are devoted to this technique.
Plans for trimming corrugated paper in layers
Not far off the New Year. Children together with their parents will certainly prepare for this holiday. They will be able to make a postcard by laying out a Christmas tree on its front side.

Prepare with children:
- corrugated paper;
- Christmas tree pattern;
- glue and a brush for it;
- pencil;
- thick sheet of paper.
First, the child will fill in the contours of the Christmas tree with green squares wound on a pencil. Then, in some places, blanks of other colors need to be glued on top of them. They will decorate the Christmas tree.
But you can do not trimming in layers, but on a plane. Then you will first need to glue the colored squares that will become toys, and then fill the surface with green.

Mom or grandmother can be presented with a souvenir scarf. They will certainly be delighted, especially since such work was done by their beloved child.

To make a scarf, you need to take:
- a sheet of red cardboard;
- corrugated paper of different colors or napkins;
- glue with a brush;
- scissors;
- pencil;
- drawing template.

Starting with small areas, have your child fill in the drawing with squares of different colors. They will need a lot. If the child does not have the patience to twist the crosscuts, help him with this so as not to reduce his interest in work.
The result is such a wonderful scarf. The next work was done together with the child by his mother. A great example to take on board. The result will be mushrooms and autumn leaves, made by trimming in layers.
To create an autumn forest, take corrugated paper in red, orange, yellow. You can also make blotches with brown, green.

For crafts, take:
- colored paper, cut into squares with a side of 2 cm;
- application templates;
- stick for trimming or pencil;
- glue;
- scissors.

You can take your favorite mushroom and leaf templates from the Internet or use the ones presented. You can draw them yourself on thick cardboard, cut them out.

The most painstaking work is cutting out squares and forming twisted blanks. To give the desired shape, place a square of paper on your left index finger. Hold it with your thumb. Place a pencil in the center of the workpiece, twist it.
As you can see, this is another option for forming parts. We will also glue in another way, so that you choose the most suitable for you.
Pour the glue into the bowl. Dipping the trimming here, attach it to the leaflet template. After gluing the red one, attach the yellow one directly to it with the help of PVA. The result is an interesting effect. Yellow is also glued to the orange blank, use green and brown squares as a base.

To make the mushrooms, line the stem with white trim and the hat with brown, yellow, or red.

Children's pictures from corrugated paper

The trimming technique will also help to make them. Such children's pictures turn out to be very cute and touching, they will remain for a long time, decorate any corner of the house.
If the child can, let him draw a round lake, reeds along its banks, swimming ducklings. He will depict where the birch, the rainbow will be, draw the horizon line. If it is difficult for a child, then adults will help.
For such work, you will need squares of corrugated paper with a side of 1.5 cm.
The larger the size of paper blanks for trimming, the higher the pile of the finished work.
After cutting them, you need to start gluing. In this case, it is best to fill the space on the left side. First fill the rainbow with colorful stripes, then make the grass around it, glue the green trimmings. Also decorate the sky from this side, fill it with twisted blue squares. Leave a place for clouds, glue white blanks here.

Also on the left side, start gluing brown details in the form of reeds, make chickens yellow, lay out the lake in blue.
Gradually moving to the right, decorate a white birch trunk with black patches twisted from paper of this color. Fill the entire space with voluminous blanks, after which you can enjoy the view of a colorful picture. For kindergarten, this craft will be an ideal option. Bringing it there, the child will certainly take first place in the competition.
But there are more complex works that schoolchildren can do.
These violas were created by students in grades 1-8. Such joint work unites children.

On a piece of drawing paper, you need to draw a viola with a pencil or transfer another image here. Then each of the guys will fill the flower with twisted trimmings of a certain color.
By the New Year, you can make winter pictures.

If you draw well, draw the future art on cardboard with a pencil, if not, then just redraw it. Embroidery patterns are a good template. They are transferred to a sheet, decorated with twisted paper pieces of a certain color.
Please note that the outlines of the Christmas trees are made of blue elements. This technique allows them to keep their shape and look fluffy, snowy.

In conclusion, see how to make a New Year's garland, which the trimming technique will also help to create.
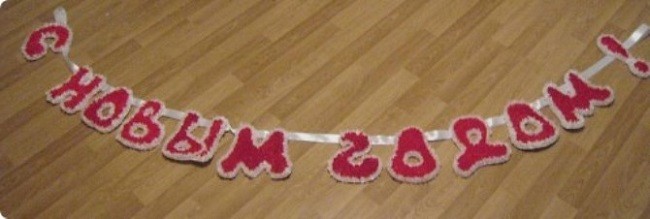
For her, on whatman paper or white cardboard, draw the letters of the future inscription, cut them out. Now each one needs to be framed first with a white trim, glue the red ones inside.
For the base, take a satin ribbon. Using a glue gun, letters are attached to it to make an inscription. Remember to keep the distance between individual words.
That's how many interesting and necessary things will help to do trimming. But this is not all that can be made in this technique. If you want to create a three-dimensional snowflake, check out the visual master class.
Another will teach you how to make a heart topiary using the same technique. You will give this to your loved one for his birthday, on Valentine's Day.
Natalya Tuchina
Facing- one of the types of paper needlework. This technology can be attributed both to the method of application and to the type of quilling (paper rolling). By using facing you can create amazing volumetric paintings, mosaics, panels, decorative interior elements, postcards. For the manufacture of paintings in this techniquethe following materials and tools are required: printed A2 sheet, corrugated paper of different colors, scissors, PVA glue, a long thin stick with a blunt end.
From paper we cut squares about 1.5 * 1.5 cm in size (the larger the square, the higher the pile of our crafts).We take a tool for facing(wooden stick or gel pen refill) put it in the middle of the square and roll the rod or stick between your fingers. Get a tube trimming, apply PVA glue to the end of the tube, glue it on a sheet with a pattern and remove the rod. Thus, we fill the entire drawing, choosing the appropriate colors of the paper.


Related publications:
In November we will celebrate a holiday - Mother's Day. Mom is the dearest and most beloved person. She always wants to make a pleasant surprise or.
Allow me to present you a master class on making a picture from colored paper. This sunny picture will warm your heart on a cold evening.
Rice work is a very exciting activity for both children and adults. Working with cereals is still very useful for the development of small ones.
My art. Painting "Charming daisies". Master Class. For work we need: - A-4 format photo frame; - colored paper.
Master class on non-traditional techniques in the visual activity "Gifts of the Forest" (painting from an eggshell). Material: shell from.
The goals of the master class: - to arouse children's interest in working with plasticine - to develop fine motor skills - to stimulate imagination and fantasy.
Beads cannot be treated indifferently. Working with beads requires great patience and attention, but in skillful hands, the product turns into.
Paper gives immense scope for creativity. They draw on it, fold it, making unusual crafts. You are already familiar with many of them, but not everyone knows about facing. This needlework technique is quite simple: pieces of paper are twisted and glued or attached to the base. The result is voluminous and airy compositions.
This needlework is of several types:
- contour. When twisted pieces of paper frame a drawing along a previously applied contour. This technique is sometimes used in conjunction with scrapbooking.
Let's look at a simple example so that you understand how to work in this technique.
To make such a violet, take:
Redraw the presented image on light cardboard. From corrugated paper, you need to cut squares with a side of 1 cm.
- With one of these tools, press a small paper blank in the center, wind it around a stick.
If you wish, you can draw only the contours of the plant, then the work will be completed faster. If, on the contrary, you want to extend the pleasure of creativity, then cut out the same squares from light paper, twist them, fill in the background, or proceed to the next work. See how the trimming of napkins is done.
To make this work, take:
From napkins, cut strips 1 cm wide, chop them into squares with the same side.
On a white sheet of cardboard, draw the outline of a tree. Apply glue to a small area so that it does not have time to dry.
At this time, take a square from a napkin, wind it around the tip of the trimming stick, glue it to the smeared contour. Then glue another one and others.
Take napkins of different colors to make the tree bright and cheerful. Fill the entire crown, paint the trunk with brown gouache.
Since you made the foliage of the tree from elements of different colors, make the picture frame from napkins of the same color.
Make a background out of blue napkins. Elements for this are also created using the facing technique.
You will get a wonderful picture that will surprise and delight everyone who sees it.
Using this technique, children and adults can do many other amazing jobs by doing flat or contour trimming.
For this, corrugated paper of yellow, orange, lilac, green, white and blue color was used.
Such flowering cacti will also help create trimming. For these crafts, take:
- well-sharpened pencil;
Let the child make three blanks from plasticine. A large oval will turn into a cactus, a small round one will become a flower, and a square one will become a pot for an artificial plant. From green corrugated paper, cut triangles, from yellow - figures of the same type, but only with an acute angle. From lilac paper you need to cut the petals.
Stick a toothpick into the cactus and the other end into the pot. Attach the flower base to the cactus. Fill his body with beautiful voluminous blanks. To do this, put a pencil in the center of the paper triangle, wrap it around the rod, stick it into the plasticine base.
To decorate a flower, you need to make 1-2 such petals, then make its middle with triangular blanks of orange paper.
See how the pot is made. It must be wrapped with a strip of colored cardboard or wrapping paper and tied with a ribbon.
A cactus made using crepe paper trimming has been created.
Look at the process of making another work using volumetric technology. It will help the child develop creative thinking, fine motor skills, imagination. Children show interest in working with paper, as a result of which such wonderful models appear.
Cut paper into small squares. Place blanks of each color in separate containers. If the child is not very small, let him draw an apple on half the sheet of the album. If he cannot do this on his own, adults will help.
- Useful article: Evening habits that prevent you from losing weight - 13 bad habits
- How to lose weight by 20 kg - real reviews of Guarchibao
Spreading small areas with glue, let him attach squares here to make a fabulous rejuvenating apple.
You can draw a branch or glue a thin strip of brown paper instead.
Prepare with children:
Work begins with drawing a Christmas tree on a sheet. You can use a template for this. Cut squares from green paper, as well as from sheets of a different color.
Mom or grandmother can be presented with a souvenir scarf. They will certainly be delighted, especially since such work was done by their beloved child.
To make a scarf, you need to take:
If the gift is made by March 8, then let dad or grandfather translate the pattern template onto cardboard. You will need a triangular part of the base. To do this, a square is drawn on cardboard, then it is cut diagonally.
Starting with small areas, have your child fill in the drawing with squares of different colors. They will need a lot. If the child does not have the patience to twist the crosscuts, help him with this so as not to reduce his interest in work.
For crafts, take:
- colored paper, cut into squares with a side of 2 cm;
It is convenient for children to glue with a brush or by taking a glue stick. Provide them with these materials, help cut paper into squares.
You can take your favorite mushroom and leaf templates from the Internet or use the ones presented. You can draw them yourself on thick cardboard, cut them out.
The most painstaking work is cutting out squares and forming twisted blanks. To give the desired shape, place a square of paper on your left index finger. Hold it with your thumb. Place a pencil in the center of the workpiece, twist it.
To make the mushrooms, line the stem with white trim and the hat with brown, yellow, or red.
The trimming technique will also help to make them. Such children's pictures turn out to be very cute and touching, they will remain for a long time, decorate any corner of the house.
After cutting them, you need to start gluing. In this case, it is best to fill the space on the left side. First fill the rainbow with colorful stripes, then make the grass around it, glue the green trimmings. Also decorate the sky from this side, fill it with twisted blue squares. Leave a place for clouds, glue white blanks here.
Also on the left side, start gluing brown details in the form of reeds, make chickens yellow, lay out the lake in blue.
On a piece of drawing paper, you need to draw a viola with a pencil or transfer another image here. Then each of the guys will fill the flower with twisted trimmings of a certain color.
If you draw well, draw the future art on cardboard with a pencil, if not, then just redraw it. Embroidery patterns are a good template. They are transferred to a sheet, decorated with twisted paper pieces of a certain color.
In conclusion, see how to make a New Year's garland, which the trimming technique will also help to create.
For her, on whatman paper or white cardboard, draw the letters of the future inscription, cut them out. Now each one needs to be framed first with a white trim, glue the red ones inside.
mishanya-g.ru
description of the process and original ideas
Contrary to its name, facing has nothing to do with the processing of the ends of any object. This design technique, often used to decorate postcards and paintings, is related to applications, but unlike the latter, it is aimed at creating volume. The subtleties of facing are very easy to master, so this activity is ideal for leisure activities with young children.
Facing: what is it?
The main attraction of the paintings created using the trimming technique lies in their some airiness and lightness, which is achieved through the use of corrugated paper - thinner and more transparent than ordinary colored paper. And also due to the technology of its cutting and fixing. Unlike other methods of working with paper, the accuracy of cutting out details does not play a role in trimming: on the contrary, the more uneven the edges are, the more attractive the finished picture will be, since it will have an individual relief. True, some rules still need to be followed in order not to step over the line between deliberate negligence, which gives liveliness, and unattractive, carelessly performed work.
To realize the idea conceived in the trimming technique, in addition to the picture, you need to stock up on colored corrugated paper, which is cut into small square, triangular or round elements 1.5-2 cm wide and long. In this case, as already mentioned, the edges can be made not only even, but also zigzag, wavy, etc. The main thing is not to increase the size of the parts unnecessarily. If the picture is large, you can make squares 3 * 3 cm, but no more. The smaller they are, the more of them will appear on a certain area, as a result of which the completed form will look more holistic.
The paper is fixed with glue using a thin long object: it can be a pencil or a match: the area of \u200b\u200bits end should be small, and at the same time it will be inconvenient to use a thin needle. The match is set exactly in the center of the paper element, after which its edges rise, clasping the match, and twist a little along it. Then the paper is pressed with fingers against the side faces of the match to strengthen the resulting paper form, and the element is seated in the chosen place with glue. At the end, it is pressed down on the same center where the match stood for 5-7 seconds. According to this algorithm, each paper blank is glued, and the larger the area to be filled, the longer it takes to work with the product, since the elements are placed butt-to-butt to each other, with maximum density. When studying the finished site, the places where the parts are joined should not be noticeable: a craft made visually with high quality using the trimming technique always resembles an expensive fluffy carpet.
Those who are just trying their hand at this method of decorating products with paper are recommended to start with simple “pictures”, working out not only the step of twisting and fixing parts, but also transitions and color combinations. For example, lay out a rainbow, trying to make the stretch as soft as possible, which is achieved by selecting a large number of shades of paper and smoothly interspersing elements into each other. If you want to try to experiment with the form, building flexible lines, start with simple geometric shapes and their bundles: first fill in the circle, making it as even as possible, then connect it to an oval - you get the head and torso of a person. After that, you can begin to deform the usual details: bend a few lines of the triangle so that you get a butterfly wing, or stretch its base in places and round the top, getting a barely opened tulip bud.
Corrugated Paper Facing Technique: Description

- The basic principles of facing as a technique were discussed above, but it should be understood that facing does not always represent the filling of a certain area. For example, there is a contour trimming technique, the name of which speaks for itself: fluffy paper twists frame the selected shape along the perimeter, and the center can either remain empty or be decorated in other techniques - quilling, scrapbooking, etc. Also, contour trimming looks interesting on crafts made in monochrome or when using only 1 color that is different from the background color. The drawn outline of the picture is simply duplicated with twisted paper to match, and not always completely - perhaps only in areas that you want to add volume.
- Plane facing is a classic for paintings and postcards, which has already been discussed above. This is a traditional filling of any form on a plane, moreover, with the combination of all forms of the pattern, an even terry carpet of twisted paper is obtained. Due to the small size of paper elements, all lines, contours and borders of the drawing are preserved, and the picture does not lose its clarity and ideas.
- There is also a technique for volumetric trimming: the algorithm of work is similar to the algorithm for planar, but a three-dimensional figure - a box, a figurine, etc. is tightly pasted over with paper twists. In addition to the fact that in this way you can give new life to an old thing, such a design idea allows you to create figures on a simple basis from cardboard, plaster, clay, etc., “revitalizing” them not with a brush and paints, but through paper decoration. Here, the degree of curl, the angle of inclination during fixation, and the size of the paper parts often vary depending on which particular shape is to be wrapped in paper. Moreover, the elements are not always attached to glue: for example, the plasticine base will independently hold paper pieces, without additional funds.
- The last option, which should be considered more of a subspecies of any of the previous techniques, rather than a separate method, is trimming in layers. It involves gluing paper rolled blanks into each other, while at the same time varying their size and density, which makes it possible to achieve very soft color transitions or realistic volume on a plane. All this affects the overall perception of the craft: the same green grass in the picture will look livelier and more natural if in places of shading it is done in a dark green hue, and where the sun's rays fall - in light green. You can use puff facing for both contour and other techniques.
Corrugated paper trimming: pictures and ideas


On the Internet and magazines devoted to needlework, you can find a lot of different pictures that will serve as the basis for planar or contour trimming, but sometimes you want something special, your own. If you have basic skills in working with graphic editors, you can draw the desired sketch on a graphics tablet, print it in a certain size and arrange it according to the trimming technique. Or do the same in Photoshop using brushes, which are a variety of elements - from basic geometric shapes to full-fledged details of nature, clothes, silhouettes, etc. You can also outline the contours of the future picture by hand, using a pencil for this - it will not be rubbed and imprinted like a pen, especially at the moment of contact with glue. It is not necessary to perform complex drawings: it is enough just to indicate the forms that will be filled, or the contours that need to be duplicated.
If in other techniques - quilling, etc. - even simple elements looked quite impressive, then in facing, pictures that have at least 4-5 details look much more interesting. Even if it is a simple sun, clouds, a house, an apple tree nearby and a wooden fence, then this is a finished product, which, after filling it with paper twists, becomes voluminous and alive, and also carries a holistic idea. A single flower, decorated according to the technology of trimming, will look no worse only if volumetric technique is used on the originally constructed frame of this flower. But even here, bonsai and topiary are much more attractive: artificial flower trees. By the way, through the volumetric trimming technique, you can even create a bridal bouquet from “artificial flowers”, or arrange a wedding table.
Corrugated paper trimming is a great idea for a home evening with the kids or even alone. Crafts made using this technology are distinguished by a special tactile softness and visual elegance, and by combining several techniques at once, you can get unusual, but very attractive paintings and sculptures.
lucky-girl.ru
corrugated paper trimming technique
 Volumetric application technique (this method of making volumetric paintings on paper is also called trimming) is one of the most popular types of paper crafts. The working technique is very simple. Such applications can be performed even by young children under the guidance of a kindergarten teacher. On the Internet you can find a variety of master classes that teach this application technique.
Corrugated paper paintings: where to start
Despite the relative simplicity of this technique of working with paper, here, as in any other type of needlework, there are subtleties. In order to visually see the work process in detail, it is recommended to first watch the video of the master class or attend the training master class in person. Of course, no one will offer novice creators to immediately take on products of the highest class of complexity. Usually beginners start with floral motifs, such as cactus or poppies. The easiest way to make a cactus.
To perform any work in the trimming technique (cactus, other flowers, landscapes) you will need:

Corrugated paper trimming technique: master class
In order to master the technique of working with corrugated paper as best as possible, you just need a little attention and patience. And soon the novice master will turn into an experienced specialist and will be able to give master classes to those who wish to master this art. In the facing technique, compositions with plant motifs look very impressive: cacti, daisies, poppies, it all depends on the author's imagination.
Having decided on the color of the main details of the work and the color of the background, it is necessary to prepare blanks for work. The facing technique initially involves working with small details, so patience and perseverance cannot be dispensed with here. But the result will meet all expectations!
To make blanks, you need to cut corrugated paper in the form of identical squares. Then you need to arrange the squares of different colors in piles and proceed to the actual trimming. Before that, it is recommended to watch a master class in order to master the art of working with a trimmer.
If you decide to make a chamomile, poppy or cactus, trimming is the process of twisting blanks into small tight tubes, which then need to be evenly distributed over the finished template and glued, filling the drawn contour. The result should be a three-dimensional picture. It can be a whole picture or a single corrugated paper cactus, the main thing is that the work is done carefully, and then the effect is guaranteed.
Corrugated paper trimming: pictures
In order to perform a multi-color composition from corrugated paper, it is necessary to clearly consider the color scheme. For beginner craftswomen, it is best to sketch a preliminary sketch with colored pencils or felt-tip pens. Attention: the more colors and shades of corrugated paper are used in the work, the more laborious the implementation will be. But the picture will look spectacular. Nevertheless, paintings of two or four colors also look very picturesque, the main thing is to choose the right plot. Attention: if the picture is multicolor, it is recommended to make the frame monophonic, and vice versa.
In order for the work to be easy and the result to meet expectations, the following practical recommendations must be taken into account:

Making three-dimensional paintings using the trimming technique is a very interesting hobby. Also, this type of leisure is of great interest to children and adolescents, since making paper crafts and, in particular, trimming, develops imagination and fine motor skills of fingers. Ready-made paper paintings will serve as a wonderful gift and decorate any interior. The main thing is a little patience, and everything will work out.
Attention, only TODAY!
1igolka.com
Goat painting. Corrugated paper trimming

How many wonderful techniques exist in the manufacture of various paper crafts: quilling, origami, Iris folding, volumetric decoupage, and this is not the whole list.
Today I want to propose to create a beautiful picture using the technique of trimming on paper. This is another wonderful technique that allows you to create magnificent works that amaze with their beauty and originality.
Kids can easily be entrusted with twisting paper and sticking it on the picture. On New Year's Eve, an excellent option would be to create a picture using the technique of trimming from corrugated paper. It will be a cute goat, which is a symbol of the coming 2015.
And we need the following materials:
- Corrugated (crepe) paper in white, brown, black, pink, yellow, red and blue
- toothpick or ballpoint pen
- scissors
- PVA glue
- goat picture template
Goat painting. Trimming from corrugated paper - a master class with a photo:
Before we get started, print or copy the goat.  We will transfer it to white cardboard or cardboard of any other color at your discretion.
  Corrugated paper is cut into squares with sides 1 cm by 1 cm.
  We apply a thick layer of PVA glue to the picture.
  We take one square of white color and put a toothpick on it.
  Fold the square in half, lightly pinch with your fingers and scroll around the toothpick.
 The resulting curls are glued to the picture.
  We glue the whole body of the goat.
  Next, we glue the legs with white curls, and the hooves with black ones.
  We paste over the goat's udder with pink twisted squares.
  We glue the ribbon on the goat's neck with red twisted squares, and the bell with yellow ones.
  We glue the muzzle with the main white color, and the eyes, nose and mouth with black.
  The horns are filled with brown twisted squares.
  When we have completely filled all the parts of the goat with twisted colored squares, we can start trimming the butterfly. We will make her little body yellow, and the wings are multi-colored and bright.
  From pink twisted squares we make a cute curl under the butterfly. We cut off excessively protruding edges of the paper with scissors so as not to spoil the main view.
So our tender and fluffy picture of a goat is ready. Trimming from corrugated paper will give you a bunch of positive emotions. Enjoy your time with such a wonderful creative process. 
do-by-hands.ru
Trimming technique: numbers, postcards, topiary.
Today I will open for you one of the simplest and at the same time original and unique decoration technique - facing. It sounds, of course, rude, but in practice the result will amaze you and those around you. You can trim with children from 5 years old. Now it is fashionable to create numbers and art objects for the holidays with your own hands, to make original photo props for photo sessions, to decorate the room yourself, the described technique will come in handy everywhere.We will need: - Corrugated or thin colored paper; - Scissors; - PVA glue or "Dragon" for art objects; - Old felt-tip pens or pens according to the number of assistants; - Half-cardboard or cardboard for the base; - For topiary, alabaster and a disposable glass;
Foundation preparation. First of all, we decide what we will produce. For a large figure, you will need an old box (for example, from under the TV). We draw a number template on it (in our case, “2”), cut it out. When it comes to postcards. We take a semi-cardboard, draw a pattern that we will decorate with a trim (in our case, the number "8"). For a topiary, take a ball from a children's dry pool or cut out a shape from cardboard, such as a heart. Two such bases are required. Glue them together by first inserting a stick-stalk between the forms. Then place the stem in a glass and pour alabaster diluted to the consistency of thick sour cream. Wait for it to harden. If the surface will be decorated with different colors, then we mark in advance where which color to use, and separate the border. Stripes, like on a two or a heart, like on a topiary, there is no limit to the imagination. What to do with paper? Cut colored paper into squares. The size depends on the size of the structure, for the figure we take squares 5 * 5 cm, for the topiary 2 * 2 cm, but not less than 1 * 1 cm. Trimming technique. Take a marker and a piece of paper. We wrap the upper part of the rod with a paper square and, holding it with our fingers, dip it into the glue. Then we firmly press it to the base, wait a few seconds and remove the rod. The square should remain glued and fluffy, like a flower.
If you use too thick paper, it will not be saturated enough for gluing. We repeat all the steps, and glue the next piece close to the previous one, slightly moving the ends of the “flower”. Glue the edges of volumetric figures with a separate row of squares so that the joints of the glued bases are not visible.
Painstaking work. Of course, the larger the figure, the longer you have to sweat. It is very important to note and tell you, dear needleworkers, that objects made using this technique cannot be wrinkled, because. the paper will lose its fluffiness. But you will save and remember a picture or craft, bright, author's, created together with the children. In addition, it is easy to restore if necessary, simply by replacing the affected fragments.
sdelaysam-svoimirukami.ru
| My trimmed trees and little MK... | wood in the technique of trimming MASTER-CLASS Bonsai, topiary, Christmas tree, Master class | Grid trimming master class (... Master Class | Tree from tapes, MK. Bonsai, topiary, Christmas tree, Master class |
| Manufacturing technology of EUROPEAN... Bonsai, topiary, Christmas tree, Master class | Magic eggshell and what you can ... | Facing Teamwork, Master class | Organza trimmings and one of the ways ... Bonsai, topiary, Christmas tree, Master class |
| "Wooden roses" and how I... Bonsai, topiary, Christmas tree, Master class | For various holidays in 1 hour Master class, craft, product | Orange tree mini MK Bonsai, topiary, Christmas tree, Master class | My topiaries. Bonsai, topiary, Christmas tree, Master class |
| A quick way to make ribbon trims Master Class | Vanilla roses in chocolate (mini MK) Bonsai, topiary, Christmas tree, Master class | Tree of pink and yellow roses...MK Bonsai, topiary, Christmas tree, Master class, Craft, product | Postcard for May 9 MK Master class, Postcard |
| Non-traditional work with paper... Master class, Teaching experience, Early development | No. 1 / Ball with roses of 3 colors... different... Master class, craft, product | Chandelier made of napkins and threads. Facing... Interior, Master class, Craft, product | pink twin trees Bonsai, topiary, Christmas tree, Master class |
| MK on a tree in a shoe Master class, craft, product | Cockerel with chickens. Toy, Master class | Improving the production of trimmings Bonsai, topiary, Christmas tree, Master class | Everyone is torn apart (video) Video, Master class |
You will need:
-
wooden stick or pencil.
corrugated, cigarette or plain colored paper;
base - cardboard, plywood, etc.;
By performing trimming according to our schemes, you will get something like a mosaic, but it will be voluminous, and the result will delight not only children, but also adults.
Technology
1. Cut paper into squares, for example, 1.5 x 1.5 cm.
2. Press the end of the stick to the center of the square and wind the paper around it. The winding density can be different, depending on the result you are striving for.
3. Take the schemes that you like for trimming. Apply glue to a small area and attach a paper twist to it without removing it from the stick. Hold it down. Remove the wand carefully.
4. In this way, cover the entire area of \u200b\u200bthe pattern with colored trimmings.
The technique of facing can be mastered by children from 4 years and older. Toddlers will need more help from adults, older kids will get the hang of it faster and will soon be able to work on their own. Start trimming with simple diagrams, gradually move on to drawings with more details.
Trimming can be used to decorate not only paintings, but also figures made of plasticine, polystyrene, decorate frames.
Trimming according to ready-made patterns will help arouse in the child an interest in painting and other arts.
| More on the topic: |
Facing: schemes
We will start the selection with simple schemes for the smallest ones, gradually moving into more complex pictures.


Trimming is a type of needlework that does not require expensive and scarce materials. The master must have an artistic taste, be able to combine colors and be ready for a long, monotonous painstaking work. The reward is a charming craft and sincere admiration of the audience.
Using the method of trimming from corrugated paper, they create paintings that look like carpets, postcards, voluminous colorful topiaries, cacti, and decorative ornaments. This type of needlework can be mastered by children of senior preschool and primary school age.
Technique and materials
Paper, as an inexpensive and pleasant material to work with, is used for many types of needlework: appliqué, quilling, origami and trimming. Corrugating paper makes it soft and comfortable for making beautiful crafts and trimming as well.
Trimming types:
- contour;
- planar;
- multilayer;
- voluminous.
Master class for beginners
For children and beginners, trimming training takes place in the manufacture of the simplest crafts. To understand the essence of this needlework, you need to explain the trimming technique, list the tools and materials, and also choose simple drawings.
Get ready for work:
- corrugated paper of the desired color;
- a sheet of thick paper or cardboard;
- stick for trimming;
- pencil;
- scissors;
- glue.
Making crafts:

Facing on a plane
Trimming from corrugated paper is easy to do with your own hands. Bright, beautiful, fluffy postcards, pleasing to the eye and touch, children are happy to create to congratulate their mothers, grandmothers, friends. For these crafts, it is enough to prepare the simplest drawings.
For postcards on March 8 on a blue background, create images of the sun, flowers, rainbows. For New Year's cards, choose drawings of snowmen, Christmas trees, forest winter landscapes. For a birthday, you can come up with postcards on any topic: a triangular scarf for a grandmother, decorated with flowers; cake and fruit on the festive table.

The most simple and, at first glance, boring drawing is transformed after it is performed using the facing technique. It is necessary to choose the right not only colors, but also shades. Poppy petals can consist of several shades of red, in the grass there can be not only green, but also yellow, and light green blades of grass.
Landscape with poppies
Necessary tools and materials:
- Colored paper.
- A stick for trimming or a toothpick, a core from a fountain pen, a pencil.
- PVA glue, scissors, contour drawing "Poppies".
Step-by-step instruction.

With this technique, any boring outline drawing can be turned into a fluffy, beautiful crepe paper painting.
Volumetric trimming
For him, you need to prepare the base in the form of a ball. You can take a tennis ball or make it from foam or plasticine, which is convenient because you can do without glue. Paste the tennis or foam balls with a cloth or napkins so that the trimmings stick better.
The base can be of any shape, it depends on the intention of the master. The volumetric trimming method is suitable for creating topiaries, cacti, decorative volumetric flowers.
cactus in a pot
To make it, take:
- plasticine;
- pencil;
- paper, cardboard, toothpick;
- tape.
Step by step manufacturing.
- From plasticine you need to fashion an oval template for a cactus, a small ball for a flower and a pot for a cactus.
- Cut paper blanks: green triangles for the cactus, orange or yellow - for the middle of the cactus flower and lilac - for the petals.
- Using a pencil, connect the cactus to the pot. Attach the flower base with a toothpick. Twist the green triangles around a sharp pencil and stick row after row into the plasticine body of the cactus until the entire base is filled.
- Also fill the base of the flower in the center with orange blanks. To make the flower more magnificent, twist only the corner that sticks into the plasticine. Then place lilac petals around.
- The pot can be wrapped in bright paper and tied with ribbon.
Topiary making
This cute souvenir, which girls love and call the tree of happiness, can be made in the form of any shape: a heart, a semi-flower, a ball with butterflies and flowers. A heart or a semi-flower is cut out of cardboard and pasted over with corrugated trimmings on both sides.
It remains to attach to the trunk and insert into the pot. To prevent the topiary from tipping over, you need to put a piece of plasticine inside the pot.

For beauty, you can apply multilayer trimming and, for example, make a topiary in the form of a green spherical tree. We make “apples” with red trimmings: we insert and glue them inside the green ones. For a topiary in the form of a Christmas tree, we insert and glue multi-colored toys.
The facing technique is becoming popular because crafts delight with their beauty, and their manufacture does not require complex training. This type of needlework brings up perseverance, patience in children, develops creative abilities, and trains fine motor skills. The necessary materials and tools are in every home. If desired, the child can do his work for a gift to his relatives, to participate in homemade competitions, to decorate the interior.
Attention, only TODAY!